<?xml version="1.0" encoding="utf-8"?>
<feed xmlns="http://www.w3.org/2005/Atom">
  <title>itgoyo&#39;blog</title>
  
  <subtitle>Talk is cheap,Show me the girl.</subtitle>
  <link href="/atom.xml" rel="self"/>
  
  <link href="https://itgoyo.github.io/"/>
  <updated>2020-01-02T05:53:54.669Z</updated>
  <id>https://itgoyo.github.io/</id>
  
  <author>
    <name>itgoyo</name>
    
  </author>
  
  <generator uri="http://hexo.io/">Hexo</generator>
  
  <entry>
    <title>2019一整年的总结与一些个人反思</title>
    <link href="https://itgoyo.github.io/2020/11/29/2019%E4%B8%80%E6%95%B4%E5%B9%B4%E7%9A%84%E6%80%BB%E7%BB%93%E4%B8%8E%E4%B8%80%E4%BA%9B%E4%B8%AA%E4%BA%BA%E5%8F%8D%E6%80%9D/"/>
    <id>https://itgoyo.github.io/2020/11/29/2019一整年的总结与一些个人反思/</id>
    <published>2020-11-29T02:33:05.000Z</published>
    <updated>2020-01-02T05:53:54.669Z</updated>
    
    <content type="html"><![CDATA[<link rel="stylesheet" class="aplayer-secondary-style-marker" href="/assets/css/APlayer.min.css"><script src="/assets/js/APlayer.min.js" class="aplayer-secondary-script-marker"></script><h3 id="折腾记录"><a href="#折腾记录" class="headerlink" title="折腾记录"></a>折腾记录</h3><p><a href="https://github.com/itgoyo/500Days-Of-Github/issues" target="_blank" rel="noopener">https://github.com/itgoyo/500Days-Of-Github/issues</a></p><h3 id="视频列表"><a href="#视频列表" class="headerlink" title="视频列表"></a>视频列表</h3><p><a href="https://space.bilibili.com/12767066" target="_blank" rel="noopener">https://space.bilibili.com/12767066</a></p><h3 id="年计划"><a href="#年计划" class="headerlink" title="年计划"></a>年计划</h3><p>又过了差不多一年，这一年发生的事情还挺多的，还有一些定下来的计划有些完成了有些没有完成。先看看大概的完成情况吧</p><ul><li style="list-style: none"><input type="checkbox" checked> 买一个 HHKB 键盘</li><li style="list-style: none"><input type="checkbox"> B站粉丝超过1000</li><li style="list-style: none"><input type="checkbox"> 给自己一年时间，掌握java开发，离开深圳回南宁。</li><li style="list-style: none"><input type="checkbox"> hongyang的blog全部看过一遍</li><li style="list-style: none"><input type="checkbox" checked> 能搭建一个论坛，至少要在本地已经实现，比如52pg.net这种可以用来卖资源也不错</li><li style="list-style: none"><input type="checkbox"> 写字方面要有质的飞跃（写完100张临摹纸   熟练使用静月夜里面的字体）</li><li style="list-style: none"><input type="checkbox" checked> 学会投资理财、至少这种想法开始养成</li><li style="list-style: none"><input type="checkbox" checked> 4月份之前换公司 15K【x】</li><li style="list-style: none"><input type="checkbox" checked> 每天坚持康复运动，身体恢复，不影响正常生活</li><li style="list-style: none"><input type="checkbox" checked> 培养自信</li><li style="list-style: none"><input type="checkbox" checked> 建立自己的知识体系</li><li style="list-style: none"><input type="checkbox" checked> 工资13K以上</li><li style="list-style: none"><input type="checkbox" checked> 英语水平有较大提高，能使用英语交流还有编辑文档(打印机+电影字幕+演讲+youtube字幕)</li><li style="list-style: none"><input type="checkbox" checked> 学会前端知识</li><li style="list-style: none"><input type="checkbox" checked> 还有java后台知识</li><li style="list-style: none"><input type="checkbox" checked> 身体恢复健康</li><li style="list-style: none"><input type="checkbox"> 写满一本活页书籍、顺带学习一些练字、还有排版上面的东西</li><li style="list-style: none"><input type="checkbox"> 找一个女朋友</li><li style="list-style: none"><input type="checkbox" checked> 搞一个4K显示器</li><li style="list-style: none"><input type="checkbox"> 看完50本编程书籍</li><li style="list-style: none"><input type="checkbox"> Github粉丝达到300个以上</li><li style="list-style: none"><input type="checkbox"> 知乎粉丝500个以上</li><li style="list-style: none"><input type="checkbox" checked> 录制一些质量比较高的视频教程</li><li style="list-style: none"><input type="checkbox"> 用好知乎、CSDN、掘金、博客园、简书等等平台实现粉丝引流（知乎上面多回答一些高质量的东西）</li><li style="list-style: none"><input type="checkbox"> 一定要打出自己在圈里小有名气</li><li style="list-style: none"><input type="checkbox"> 写一本书Gitbook</li><li style="list-style: none"><input type="checkbox" checked> 学会欣赏音乐、书法、画</li><li style="list-style: none"><input type="checkbox" checked> 培养自己的气质、穿衣能力</li><li style="list-style: none"><input type="checkbox" checked> 多出去走走看看、世界很大同样很美，但只有你走出去你才会发现</li><li style="list-style: none"><input type="checkbox"> 读50本理财书籍，并且做笔记</li><li style="list-style: none"><input type="checkbox"> 看演讲，多学习马云，还有其他演说家的演讲</li><li style="list-style: none"><input type="checkbox" checked> 看好看的电影，看好看的风景</li><li style="list-style: none"><input type="checkbox" checked> 改掉自己孤傲的毛病，谦虚请教。</li><li style="list-style: none"><input type="checkbox"> Quora回答超过100个问题</li><li style="list-style: none"><input type="checkbox" checked> 训练自己讲课时候的谈吐还有矫正口齿不清的毛病</li></ul><h3 id="身体状况"><a href="#身体状况" class="headerlink" title="身体状况"></a>身体状况</h3><p>去年的腰伤逐渐好转，今年在工作上已经可以坐办公室很久了，相比于去年坐个5min都疼得不行的身子，今年算是恢复了挺多的，现在基本坐个两小时才有明显的疼痛感。</p><p>腰伤真是我这辈子以来经历过最难过的病痛，如果没有经历过或者身子没啥大问题的你，平时最好多锻炼，如果是健身的，最好请一个私教，我的腰伤估计就是没有请私教然后自己乱玩哑铃给弄伤的。说真的有一些钱还是挺有必要出的，特别是关于身体健康的钱，这个可抠不得。</p><p>现在的我基本每天都有坐康复训练，特别是平躺时候的腹部呼吸，这个对于腰伤特别有帮助，如果你刚好也有这个问题的话，我最推荐的康复运动就是这个叫<code>腹式呼吸</code>的康复动作。我的腰突康复的临界点就是做了这个动作之后才感觉到自己的腰确实是有康复的，之前有做针灸有做倒走有做过吊单杠，效果都不是很明显，唯独这个<code>腹式呼吸</code>，别看他就是在床上躺着，用腹部呼吸，但是效果极其明显有用，真心推荐给病友们。</p><h3 id="学习收获"><a href="#学习收获" class="headerlink" title="学习收获"></a>学习收获</h3><p>这一整年本来是计划重点是在强化<code>Java</code>的知识然后转做后台开发的，但是由于各种原因没能做到，但是一整年学来也学习挺多知识的，虽然很多现在也忘掉了，哈哈，但是我真的有去好好学好好得去了解了。</p><p>今年有跟着黑马视频学习HTML还有前端、Nodejs、Go基础知识等等，但是没有系统地去运用，学了一段时间之后就忘得差不多了，所以说平时还是要结合项目来复习的，不然就像大学学习到点知识一样，一学就忘，根本就不会用，这或许也是很多企业不想招收<code>应届生</code>的原因吧，毕竟经验少，接触到大项目的就更少了，招进来又不能马上做出东西，企业还要花时间去培养你，这样子的成本很高的，一般企业都不会这么做。除非是大企业，比如<code>BAT</code>，但是别人招聘的时候是层层帅选出来的，都是尖子生中的尖子，别人愿意花时间，花升本去培养你去带你。因为这样子自己带出来的学生没有社招的人那种乱七八糟的毛病或者是乱七八糟的编码习惯。因为你们更像是一张白纸，这样子的人更容易教，更好带，反观社招的人，已经有工龄了，而且大多数都有自己的编码习惯，而且是那种非常难改的那种习惯。企业不喜欢这种不听管教（不太能改变自己以往习惯）的人，企业更喜欢教更喜欢带那种可以接受加班，愿意学更多东西的菜鸟。</p><p>关于今年做的也有好几个项目也成功上线了，但重点还是老项目的迭代上面，毕竟是公司直接盈利的项目。别的两三个项目相当于公司砸钱来玩的，毕竟做一个网校没有那么简单，如果没有线上的盈利，是支撑不了网校项目的折腾的。就连沪江网校这种都没能盈利别的小公司的想在网校中做大或者说挣钱就更难了，即便如今是一个付费时代。</p><p>自学或者说自己解决遇到的问题对我的帮助很大，远大于我从视频上面或者是书本上面学到的东西。我感觉和身边人的区别就是，我自己经常折腾遇到的难题都能从网上找到答案，无论是在Github上面提交issue还是在stackoverflow上面问问题，或者是各大论坛上面讨论，这些都使我学习到更多知识，或者说是解决了我的问题。感觉自己对Android开发又有更加深刻的认识。</p><h3 id="效率"><a href="#效率" class="headerlink" title="效率"></a>效率</h3><p>关于<code>效率</code>我其实有很多话要说，毕竟我们工作生活诸如此类的我们都离不开效率这个东西，其实你们有时候也会发现，很多时候自己的努力都是无用的，自己的无用复出只是在自我感动，把自己花比别人更多的时间来做某事，以此来感动自己，觉得自己花的时间比别人多，学习到的也比别人更多，自己进步比别人更加大。但是对不起，事实并不是你想的这样。很多时候你做得都是无用功，别人做的比你少，别人看着都在玩，但是别人就是比你厉害，做东西比你快，因为别人的效率比你高。我能一天做完的东西为什么要花一周来做完？很多时候都是我们自己的自以为是才导致自己的目光短浅。</p><p>关于效率我推荐你们可以认真学习一些<code>vim</code>,学习一下这个软件，重点是学习它的编辑思想，对你们在日常使用或者编码上面很有帮助。以前我总是觉得IOS的哥们做东西比我快，但是自从我深入学习了解过Vim之后，我和IOS哥们相同时间做东西，我都会有空余的时间用来搞其他东西。因为Vim节省了我很多时间，它提高了我的编码效率还有日常使用的效率,做一样的事情花更少的时间，难道这还不是你要认真学好<code>Vim</code>的理由吗。</p><p>每天都罗列出自己的每日计划，把自己要做到东西都列出来，当完成的时候就勾选掉，这样子每天小日子都过得井井有条，不会和平时一样每天都不不知道自己要干嘛，总是看起来很闲的样子。因为计划上面有你没有完成的事情，所以你提醒自己今天要去完成它，这样子你就有一个目标，去实现它，这样子时间就会过去了。我这里推荐的计划软件是<code>Evernote</code>也就是我们平时所说的<code>印象笔记</code>,这两年印象笔记还支持了<code>Markdown</code>的语法，这就更有理由去使用它了。</p><h3 id="录制视频"><a href="#录制视频" class="headerlink" title="录制视频"></a>录制视频</h3><p>今天在B站上面录制了些视频，感觉还是有人看的，也帮助到了一些观众朋友。做视频其实有以下几方面的原因：</p><ul><li><p>问题记录<br>自己遇到的问题记录下面下次如果还遇到相同的问题，可以查看一下当初自己是怎么做的</p></li><li><p>兴趣爱好<br>平时下班没啥事情做的时候录制视频教程就是我的爱好，可以用来打发时间啥的，很有用</p></li><li><p>个人IP<br>现在社会那么多事情，那么多人，打造一个个人IP岂不是很好？当别人说到Android的时候就能想到<code>hongyang</code>，说到最强编辑器的时候就会想到<code>Vim</code>和<code>Emacs</code>,当说到最会折腾的人就想到<code>itgoyo</code>,这岂不是很美滋滋，醒醒！现在还是白天，不要做白日梦了。</p></li></ul><p>为了弄好视频自己还更换了<code>RX590</code>来更新自己的黑苹果，为了用到生下来的<code>750TI</code>自己还弄了一台二手的主板组装成自己的一台<code>Linux主机</code>，自己还用上了微单，补光灯，就连幕布自己也买了，就是为了做出更好的视频，以上总总吧都是我录制视频的原因。</p><h3 id="2020计划"><a href="#2020计划" class="headerlink" title="2020计划"></a>2020计划</h3><ul><li><p>Android高级开发</p></li><li><p>Java后台开发</p></li><li><p>会点前端</p></li><li><p>会点Go</p></li><li><p>熟练使用Vim编辑器</p></li><li><p>出N多视频教程</p></li><li><p>工资15K以上</p></li><li><p>编码效率上面的提示是波峰式</p></li><li><p>CSDN 排名前5000</p></li><li><p>写的文章至少500篇以上</p></li><li><p>学会五笔打字</p></li><li><p>打字速度有质变得飞跃</p></li><li><p>B站粉丝过W</p></li><li><p>Github粉丝过500</p></li><li><p>找一个女朋友</p></li><li><p>旅游</p></li><li><p>一家人身体健康【最好腰突治愈了】</p></li><li><p>给爸妈买很多他们喜欢到东西</p></li><li><p>视频剪辑的大拿【Youtube学习】</p></li><li><p>自己的普通话发音更好【旁白-刻意练习-口语发音】</p></li></ul><hr><div align="center"><br><br>        发现更多更好玩的，欢迎关注我的微信公众号:<span style="color:red;"> FullStacker </span><br><br>        <img src="/img/fullstacker.jpg" height="400px" width="400px"><br>    </div>]]></content>
    
    <summary type="html">


        &lt;link rel=&quot;stylesheet&quot; class=&quot;aplayer-secondary-style-marker&quot; href=&quot;/assets/css/APlayer.min.css&quot;&gt;&lt;script src=&quot;/assets/js/APlayer.min.js&quot; cla
      
    
    </summary>
    
      <category term="生活随笔" scheme="https://itgoyo.github.io/categories/%E7%94%9F%E6%B4%BB%E9%9A%8F%E7%AC%94/"/>
    
    
      <category term="生活随笔" scheme="https://itgoyo.github.io/tags/%E7%94%9F%E6%B4%BB%E9%9A%8F%E7%AC%94/"/>
    
  </entry>
  
  <entry>
    <title>如何免费做一个属于自己稳定有效的图床</title>
    <link href="https://itgoyo.github.io/2020/01/02/%E5%A6%82%E4%BD%95%E5%85%8D%E8%B4%B9%E5%81%9A%E4%B8%80%E4%B8%AA%E5%B1%9E%E4%BA%8E%E8%87%AA%E5%B7%B1%E7%A8%B3%E5%AE%9A%E6%9C%89%E6%95%88%E7%9A%84%E5%9B%BE%E5%BA%8A/"/>
    <id>https://itgoyo.github.io/2020/01/02/如何免费做一个属于自己稳定有效的图床/</id>
    <published>2020-01-02T07:04:23.000Z</published>
    <updated>2020-01-02T07:35:19.360Z</updated>
    
    <content type="html"><![CDATA[<link rel="stylesheet" class="aplayer-secondary-style-marker" href="/assets/css/APlayer.min.css"><script src="/assets/js/APlayer.min.js" class="aplayer-secondary-script-marker"></script><blockquote><p>由于现在很多写作平台都支持了<code>Markdown</code>语法，导致图床用的人越来越多。使用别人的免费图床偶尔会出现图片加载不出来的情况，或者是图床图片已经失效的情况，后面再想补回图片忘了原图是什么样子的了，这样子就得不偿失了。于是乎搭建一个属于自己的问题免费的图床就显得很有必要了。</p></blockquote><h3 id="PicGo"><a href="#PicGo" class="headerlink" title="PicGo"></a>PicGo</h3><p><a href="https://github.com/Molunerfinn/PicGo" target="_blank" rel="noopener">项目地址</a></p><p>应用截图如下：<br><img src="https://raw.githubusercontent.com/itgoyo/PicGoRes/master/img/picgo.png" alt=""></p><p>软件下载地址：<a href="https://github.com/Molunerfinn/PicGo/releases" target="_blank" rel="noopener">https://github.com/Molunerfinn/PicGo/releases</a></p><p>这里我们使用的是图床是Github的图床，也就是说把图片上传到我们Github上面自己的仓库，注意是<code>共有仓库</code>，如果项目是<code>私有仓库</code>，有可能出现图片加载不出来的情况，所以这里的仓库推荐创建公有仓库，名称可以自己随意起（不能还有中文）。<br>例如我就把我的图床叫做<code>PicGoRes</code>,关于图片上面配置的信息我们如何获取到自己的实际的配置呢，可以参考作者给的教程：<a href="https://picgo.github.io/PicGo-Doc/zh/guide/config.html" target="_blank" rel="noopener">配置手册</a></p><h3 id="GitHub-图床"><a href="#GitHub-图床" class="headerlink" title="GitHub 图床"></a>GitHub 图床</h3><figure class="highlight plain"><table><tr><td class="gutter"><pre><span class="line">1</span><br><span class="line">2</span><br><span class="line">3</span><br><span class="line">4</span><br><span class="line">5</span><br><span class="line">6</span><br><span class="line">7</span><br></pre></td><td class="code"><pre><span class="line">&#123;</span><br><span class="line">  &quot;repo&quot;: &quot;&quot;, // 仓库名，格式是username/reponame</span><br><span class="line">  &quot;token&quot;: &quot;&quot;, // github token</span><br><span class="line">  &quot;path&quot;: &quot;&quot;, // 自定义存储路径，比如img/</span><br><span class="line">  &quot;customUrl&quot;: &quot;&quot;, // 自定义域名，注意要加http://或者https://</span><br><span class="line">  &quot;branch&quot;: &quot;&quot; // 分支名，默认是master</span><br><span class="line">&#125;</span><br></pre></td></tr></table></figure><p><strong>1.</strong> 首先你得有一个 GitHub 账号。注册 GitHub 就不用我多言。</p><p><strong>2.</strong> 新建一个仓库</p><p><img src="https://raw.githubusercontent.com/Molunerfinn/test/master/picgo/create_new_repo.png" alt=""></p><p>记下你取的仓库名。</p><p><strong>3.</strong> 生成一个 token 用于 PicGo 操作你的仓库：</p><p>访问：<a href="https://github.com/settings/tokens" target="_blank" rel="noopener">https://github.com/settings/tokens</a></p><p>然后点击 <code>Generate new token</code>。</p><p><img src="https://raw.githubusercontent.com/Molunerfinn/test/master/picgo/generate_new_token.png" alt=""></p><p>把 repo 的勾打上即可。然后翻到页面最底部，点击 <code>Generate token</code> 的绿色按钮生成 token。</p><p><img src="https://raw.githubusercontent.com/Molunerfinn/test/master/picgo/20180508210435.png" alt=""></p><p><strong>注意</strong> 这个 token 生成后只会显示一次！你要把这个 token 复制一下存到其他地方以备以后要用。</p><p><img src="https://raw.githubusercontent.com/Molunerfinn/test/master/picgo/copy_token.png" alt=""></p><p><strong>4.</strong> 配置 PicGo</p><p><strong> 注意：</strong> 仓库名的格式是<code>用户名/仓库</code>，比如我创建了一个叫做 <code>test</code> 的仓库，在 PicGo 里我要设定的仓库名就是 <code>Molunerfinn/test</code>。一般我们选择 <code>master</code> 分支即可。然后记得点击确定以生效，然后可以点击<code>设为默认图床</code>来确保上传的图床是 GitHub。</p><p><img src="https://raw.githubusercontent.com/Molunerfinn/test/master/picgo/setup_github.png" alt=""></p><p>至此配置完毕，已经可以使用了。当你上传的时候，你会发现你的仓库里也会增加新的图片了</p><p>如果不会配置的可以参考我的配置：<br><figure class="highlight plain"><table><tr><td class="gutter"><pre><span class="line">1</span><br><span class="line">2</span><br><span class="line">3</span><br><span class="line">4</span><br><span class="line">5</span><br><span class="line">6</span><br></pre></td><td class="code"><pre><span class="line">PicGo</span><br><span class="line">itgoyo/PicGoRes</span><br><span class="line">master</span><br><span class="line">67c3d863345axxxxxx</span><br><span class="line">img/</span><br><span class="line">https://raw.githubusercontent.com/itgoyo/PicGoRes/master</span><br></pre></td></tr></table></figure></p><p>以上token请自行更换成自己的token，还有域名请更换成自己的id和仓库名称。</p><p>值得注意的是v2.2.0+版本支持截图上传到服务器的功能，还可以设置快捷键：<br><img src="https://raw.githubusercontent.com/itgoyo/PicGoRes/master/img/pic.png" alt=""></p><p>但是要在插件的地方安装<code>picgo-plugin-quick-capture</code>，然后自己设置一个自己喜欢的快捷键即可截图上传到服务器上，真的是太方便了。</p><hr><div align="center"><br><br>        发现更多更好玩的，欢迎关注我的微信公众号:<span style="color:red;"> FullStacker </span><br><br>        <img src="/img/fullstacker.jpg" height="400px" width="400px"><br>    </div>]]></content>
    
    <summary type="html">


        &lt;link rel=&quot;stylesheet&quot; class=&quot;aplayer-secondary-style-marker&quot; href=&quot;/assets/css/APlayer.min.css&quot;&gt;&lt;script src=&quot;/assets/js/APlayer.min.js&quot; cla
      
    
    </summary>
    
      <category term="开源项目" scheme="https://itgoyo.github.io/categories/%E5%BC%80%E6%BA%90%E9%A1%B9%E7%9B%AE/"/>
    
    
      <category term="Android" scheme="https://itgoyo.github.io/tags/Android/"/>
    
  </entry>
  
  <entry>
    <title>关于自己每日计划是如何制定的</title>
    <link href="https://itgoyo.github.io/2020/01/02/%E5%85%B3%E4%BA%8E%E8%87%AA%E5%B7%B1%E6%AF%8F%E6%97%A5%E8%AE%A1%E5%88%92%E6%98%AF%E5%A6%82%E4%BD%95%E5%88%B6%E5%AE%9A%E7%9A%84/"/>
    <id>https://itgoyo.github.io/2020/01/02/关于自己每日计划是如何制定的/</id>
    <published>2020-01-02T02:19:03.000Z</published>
    <updated>2020-01-02T05:51:53.786Z</updated>
    
    <content type="html"><![CDATA[<link rel="stylesheet" class="aplayer-secondary-style-marker" href="/assets/css/APlayer.min.css"><script src="/assets/js/APlayer.min.js" class="aplayer-secondary-script-marker"></script><p>用到的软件有：</p><ul><li><p>Evernote</p></li><li><p>Reminds(Mac自带软件)</p></li><li><p>番茄时钟法（Chrome插件）</p></li></ul><p>Evernote只要是记录每天要做到事情，以后有事没事拿出来翻翻还可以当作是回忆，毕竟现在脑子感觉记不住太多东西了<br><img src="https://raw.githubusercontent.com/itgoyo/PicGoRes/master/img/20200102105511.png" alt=""></p><p>Reminds是用来提醒到点用的，右上小自动弹出这个弹窗来提醒你时间到了，该干嘛干嘛去<br><img src="https://raw.githubusercontent.com/itgoyo/PicGoRes/master/img/607566EB-0937-4C13-BD3D-EA91B1BA9373.png" alt=""></p><p>还有就是番茄时钟，这个主要是用来计时用的，每过25min之后就停下来休息5min，据说是最科学的方法</p><p><img src="https://raw.githubusercontent.com/itgoyo/PicGoRes/master/img/B367AAA6-7957-4276-BC0E-0D3C7FFA855E.png" alt=""></p><p>如果你和我一样都是一个经常分身或者是不能专注的人，那么我这里挺推荐你弄一个和我一样的计划，这样子你就会知道自己每天原来有那么多东西要做，那么多东西没做，然后一件一件的去完成，而不是每天浑浑噩噩的不知道自己要干嘛。</p><p>自律的人最可怕，一起来自律吧。</p><hr><div align="center"><br><br>        发现更多更好玩的，欢迎关注我的微信公众号:<span style="color:red;"> FullStacker </span><br><br>        <img src="/img/fullstacker.jpg" height="400px" width="400px"><br>    </div>]]></content>
    
    <summary type="html">


        &lt;link rel=&quot;stylesheet&quot; class=&quot;aplayer-secondary-style-marker&quot; href=&quot;/assets/css/APlayer.min.css&quot;&gt;&lt;script src=&quot;/assets/js/APlayer.min.js&quot; cla
      
    
    </summary>
    
      <category term="生活随笔" scheme="https://itgoyo.github.io/categories/%E7%94%9F%E6%B4%BB%E9%9A%8F%E7%AC%94/"/>
    
    
      <category term="生活随笔" scheme="https://itgoyo.github.io/tags/%E7%94%9F%E6%B4%BB%E9%9A%8F%E7%AC%94/"/>
    
  </entry>
  
  <entry>
    <title>java多线程的4种实现方式</title>
    <link href="https://itgoyo.github.io/2019/12/31/java%E5%A4%9A%E7%BA%BF%E7%A8%8B%E7%9A%844%E7%A7%8D%E5%AE%9E%E7%8E%B0%E6%96%B9%E5%BC%8F/"/>
    <id>https://itgoyo.github.io/2019/12/31/java多线程的4种实现方式/</id>
    <published>2019-12-31T08:00:37.000Z</published>
    <updated>2020-01-02T05:55:30.571Z</updated>
    
    <content type="html"><![CDATA[<link rel="stylesheet" class="aplayer-secondary-style-marker" href="/assets/css/APlayer.min.css"><script src="/assets/js/APlayer.min.js" class="aplayer-secondary-script-marker"></script><p>1. 继承 Thread 类，重写 run 方法（其实 Thread 类本身也实现了 Runnable 接口）</p><p>2. 实现 Runnable 接口，重写 run 方法</p><p>3. 实现 Callable 接口，重写 call 方法（有返回值）</p><p>4. 使用线程池（有返回值）</p><p>1. 继承 Thread 类，重写 run 方法</p><p>　　每次创建一个新的线程，都要新建一个 Thread 子类的对象</p><p>　　启动线程，new Thread 子类（）.start（）</p><p>　　创建线程实际调用的是父类 Thread 空参的构造器</p><figure class="highlight plain"><table><tr><td class="gutter"><pre><span class="line">1</span><br><span class="line">2</span><br><span class="line">3</span><br><span class="line">4</span><br><span class="line">5</span><br><span class="line">6</span><br><span class="line">7</span><br><span class="line">8</span><br><span class="line">9</span><br><span class="line">10</span><br><span class="line">11</span><br><span class="line">12</span><br><span class="line">13</span><br><span class="line">14</span><br><span class="line">15</span><br><span class="line">16</span><br><span class="line">17</span><br></pre></td><td class="code"><pre><span class="line">public class MyThread &#123;</span><br><span class="line"></span><br><span class="line">    public static void main(String ards[])&#123;</span><br><span class="line">        for(int i=0;i&lt;10;i++)&#123;</span><br><span class="line">            new ExtendsThread().start();</span><br><span class="line">        &#125;</span><br><span class="line">        System.out.println(Thread.currentThread().getName());</span><br><span class="line">    &#125;</span><br><span class="line"></span><br><span class="line">&#125;</span><br><span class="line"></span><br><span class="line">class ExtendsThread extends Thread&#123;</span><br><span class="line">    @Override</span><br><span class="line">    public void run() &#123;</span><br><span class="line">        System.out.println(Thread.currentThread().getName());</span><br><span class="line">    &#125;</span><br><span class="line">&#125;</span><br></pre></td></tr></table></figure><p>2. 实现 Runnable 接口，重写 run 方法</p><p>　　不论创建多少个线程，只需要创建一个 Runnable 接口实现类的对象</p><p>　　启动线程，new Thread（Runnable 接口实现类的对象）.start ()</p><p> 　　创建线程调用的是 Thread 类 Runable 类型参数的构造器 　　</p><figure class="highlight plain"><table><tr><td class="gutter"><pre><span class="line">1</span><br><span class="line">2</span><br><span class="line">3</span><br><span class="line">4</span><br><span class="line">5</span><br><span class="line">6</span><br><span class="line">7</span><br><span class="line">8</span><br><span class="line">9</span><br><span class="line">10</span><br><span class="line">11</span><br><span class="line">12</span><br><span class="line">13</span><br><span class="line">14</span><br><span class="line">15</span><br><span class="line">16</span><br><span class="line">17</span><br><span class="line">18</span><br><span class="line">19</span><br><span class="line">20</span><br><span class="line">21</span><br><span class="line">22</span><br></pre></td><td class="code"><pre><span class="line"></span><br><span class="line"></span><br><span class="line">public class MyThread &#123;</span><br><span class="line"></span><br><span class="line">    public static void main(String ards[])&#123;</span><br><span class="line">        Runnable implRunnable = new ImplRunnable();</span><br><span class="line">        for(int i=0;i&lt;10;i++)&#123;</span><br><span class="line">            new Thread(implRunnable).start();</span><br><span class="line">        &#125;</span><br><span class="line">        System.out.println(Thread.currentThread().getName());</span><br><span class="line">    &#125;</span><br><span class="line"></span><br><span class="line">&#125;</span><br><span class="line"></span><br><span class="line">class ImplRunnable implements Runnable&#123;</span><br><span class="line">    private volatile  int i = 0;</span><br><span class="line">    @Override</span><br><span class="line">    public void run() &#123;</span><br><span class="line">        System.out.println(Thread.currentThread().getName()+&quot;--&quot;+ i++);</span><br><span class="line"></span><br><span class="line">    &#125;</span><br><span class="line">&#125;</span><br></pre></td></tr></table></figure><p>3. 实现 Callable 接口，重写 call 方法（有返回值）</p><p>　　自定义类实现 Callable 接口时，必须指定泛型，该泛型即返回值的类型</p><p>　　每次创建一个新的线程，都要创建一个新的 Callable 接口的实现类、</p><p>　　如何启动线程？</p><p>　　　　（1）创建一个 Callable 接口的实现类的对象</p><p>　　　　（2）创建一个 FutureTask 对象，传入 Callable 类型的参数</p><p>　　　　　　　　public FutureTask(Callable<v> callable){……}</v></p><p>　　　　（3）调用 Thread 类重载的参数为 Runnable 的构造器创建 Thread 对象</p><p>　　　　　　　　将 FutureTask 作为参数传递</p><p>　　　　　　　　public class FutureTask<v> implements RunnableFuture<v></v></v></p><p>　　　　　　　　public interface RunnableFuture<v> extends Runnable, Future<v></v></v></p><p>　　如何获取返回值？</p><p>　　　　调用 FutureTask 类的 get () 方法</p><figure class="highlight plain"><table><tr><td class="gutter"><pre><span class="line">1</span><br><span class="line">2</span><br><span class="line">3</span><br><span class="line">4</span><br><span class="line">5</span><br><span class="line">6</span><br><span class="line">7</span><br><span class="line">8</span><br><span class="line">9</span><br><span class="line">10</span><br><span class="line">11</span><br><span class="line">12</span><br><span class="line">13</span><br><span class="line">14</span><br><span class="line">15</span><br><span class="line">16</span><br><span class="line">17</span><br><span class="line">18</span><br><span class="line">19</span><br><span class="line">20</span><br><span class="line">21</span><br><span class="line">22</span><br><span class="line">23</span><br><span class="line">24</span><br><span class="line">25</span><br><span class="line">26</span><br><span class="line">27</span><br><span class="line">28</span><br><span class="line">29</span><br><span class="line">30</span><br><span class="line">31</span><br></pre></td><td class="code"><pre><span class="line"></span><br><span class="line"></span><br><span class="line"></span><br><span class="line">public class MyThread &#123;</span><br><span class="line"></span><br><span class="line">    public static void main(String ards[]) throws InterruptedException, ExecutionException&#123;</span><br><span class="line"></span><br><span class="line">        for(int i=0;i&lt;10;i++)&#123;</span><br><span class="line">            Callable&lt;Integer&gt; implCallable = new ImplCallable();</span><br><span class="line">            FutureTask&lt;Integer&gt; futureTask = new FutureTask&lt;Integer&gt;(implCallable);</span><br><span class="line">            new Thread(futureTask).start(); System.out.println(Thread.currentThread().getName()+&quot;----&quot;+futureTask.get());</span><br><span class="line">        &#125;</span><br><span class="line"></span><br><span class="line">        System.out.println(Thread.currentThread().getName());</span><br><span class="line">    &#125;</span><br><span class="line"></span><br><span class="line">&#125;</span><br><span class="line"></span><br><span class="line">class ImplCallable implements Callable&lt;Integer&gt;&#123;</span><br><span class="line"></span><br><span class="line">    @Override</span><br><span class="line">    public Integer call() throws Exception &#123;</span><br><span class="line">        int result = 0;</span><br><span class="line">        for(int i=0;i&lt;10;i++)&#123;</span><br><span class="line">            result += i;</span><br><span class="line">        &#125;</span><br><span class="line">        System.out.println(Thread.currentThread().getName());</span><br><span class="line">        return result;</span><br><span class="line">    &#125;</span><br><span class="line"></span><br><span class="line">&#125;</span><br></pre></td></tr></table></figure><p>4. 线程池</p><p>Executors 类<br><figure class="highlight plain"><table><tr><td class="gutter"><pre><span class="line">1</span><br><span class="line">2</span><br><span class="line">3</span><br><span class="line">4</span><br><span class="line">5</span><br><span class="line">6</span><br><span class="line">7</span><br><span class="line">8</span><br><span class="line">9</span><br><span class="line">10</span><br><span class="line">11</span><br><span class="line">12</span><br><span class="line">13</span><br><span class="line">14</span><br><span class="line">15</span><br><span class="line">16</span><br><span class="line">17</span><br><span class="line">18</span><br><span class="line">19</span><br><span class="line">20</span><br><span class="line">21</span><br><span class="line">22</span><br><span class="line">23</span><br><span class="line">24</span><br><span class="line">25</span><br><span class="line">26</span><br><span class="line">27</span><br><span class="line">28</span><br><span class="line">29</span><br><span class="line">30</span><br><span class="line">31</span><br><span class="line">32</span><br><span class="line">33</span><br><span class="line">34</span><br><span class="line">35</span><br><span class="line">36</span><br><span class="line">37</span><br></pre></td><td class="code"><pre><span class="line"></span><br><span class="line"></span><br><span class="line">/** *</span><br><span class="line"> * 线程池</span><br><span class="line"> * 跟数据库连接池类似</span><br><span class="line"> * 避免了线程的创建和销毁造成的额外开销</span><br><span class="line"> *</span><br><span class="line"> * java.util.concurrent</span><br><span class="line"> *</span><br><span class="line"> * Executor    负责现成的使用和调度的根接口</span><br><span class="line"> *    |--ExecutorService    线程池的主要接口</span><br><span class="line"> *          |--ThreadPoolExecutor    线程池的实现类</span><br><span class="line"> *          |--ScheduledExecutorService    接口，负责线程的调度</span><br><span class="line"> *              |--ScheduledThreadPoolExecutor    (extends ThreadPoolExecutor implements ScheduledExecutorService)</span><br><span class="line"> *</span><br><span class="line"> *</span><br><span class="line"> * Executors工具类</span><br><span class="line"> * 提供了创建线程池的方法</span><br><span class="line"> * */</span><br><span class="line">public class ThreadPool &#123; public static void main(String[] args)&#123; //使用Executors工具类中的方法创建线程池</span><br><span class="line">        ExecutorService pool = Executors.newFixedThreadPool(5);</span><br><span class="line"></span><br><span class="line">        ThreadPoolDemo demo = new ThreadPoolDemo(); //为线程池中的线程分配任务,使用submit方法，传入的参数可以是Runnable的实现类，也可以是Callable的实现类</span><br><span class="line">        for(int i=1;i&lt;=5;i++)&#123;</span><br><span class="line">            pool.submit(demo);</span><br><span class="line">        &#125; //关闭线程池 //shutdown ： 以一种平和的方式关闭线程池，在关闭线程池之前，会等待线程池中的所有的任务都结束，不在接受新任务 //shutdownNow ： 立即关闭线程池</span><br><span class="line"> pool.shutdown();</span><br><span class="line"></span><br><span class="line">    &#125;</span><br><span class="line">&#125; class ThreadPoolDemo implements Runnable&#123; /**多线程的共享数据*/</span><br><span class="line">    private int i = 0;</span><br><span class="line"></span><br><span class="line">    @Override public void run() &#123; while(i&lt;=50)&#123;</span><br><span class="line">            System.out.println(Thread.currentThread().getName()+&quot;---&quot;+ i++);</span><br><span class="line">        &#125;</span><br><span class="line">    &#125;</span><br><span class="line">&#125;</span><br></pre></td></tr></table></figure></p><figure class="highlight plain"><table><tr><td class="gutter"><pre><span class="line">1</span><br><span class="line">2</span><br><span class="line">3</span><br><span class="line">4</span><br><span class="line">5</span><br><span class="line">6</span><br><span class="line">7</span><br><span class="line">8</span><br><span class="line">9</span><br><span class="line">10</span><br><span class="line">11</span><br><span class="line">12</span><br><span class="line">13</span><br><span class="line">14</span><br><span class="line">15</span><br><span class="line">16</span><br><span class="line">17</span><br><span class="line">18</span><br><span class="line">19</span><br><span class="line">20</span><br><span class="line">21</span><br><span class="line">22</span><br></pre></td><td class="code"><pre><span class="line"></span><br><span class="line"></span><br><span class="line">public class ThreadPool2 &#123; public static void main(String args[])&#123;</span><br><span class="line">        ExecutorService executorService = Executors.newFixedThreadPool(5); for(int i=0;i&lt;5;i++)&#123;</span><br><span class="line">            Future&lt;Integer&gt; future = executorService.submit(new Callable&lt;Integer&gt;() &#123;</span><br><span class="line"></span><br><span class="line">                @Override public Integer call() throws Exception &#123; int result = 0; for(int i=0;i&lt;=10;i++)&#123;</span><br><span class="line">                        result += i;</span><br><span class="line">                    &#125; return result;</span><br><span class="line">                &#125;</span><br><span class="line">            &#125;); try &#123;</span><br><span class="line">                System.out.println(Thread.currentThread().getName()+&quot;--&quot;+future.get());</span><br><span class="line">            &#125; catch (InterruptedException | ExecutionException e) &#123;</span><br><span class="line">                e.printStackTrace();</span><br><span class="line">            &#125;</span><br><span class="line">        &#125;</span><br><span class="line"></span><br><span class="line">        executorService.shutdown();</span><br><span class="line"></span><br><span class="line">    &#125;</span><br><span class="line"></span><br><span class="line">&#125;</span><br></pre></td></tr></table></figure><hr><div align="center"><br><br>        发现更多更好玩的，欢迎关注我的微信公众号:<span style="color:red;"> FullStacker </span><br><br>        <img src="/img/fullstacker.jpg" height="400px" width="400px"><br>    </div>]]></content>
    
    <summary type="html">


        &lt;link rel=&quot;stylesheet&quot; class=&quot;aplayer-secondary-style-marker&quot; href=&quot;/assets/css/APlayer.min.css&quot;&gt;&lt;script src=&quot;/assets/js/APlayer.min.js&quot; cla
      
    
    </summary>
    
      <category term="Linux" scheme="https://itgoyo.github.io/categories/Linux/"/>
    
    
      <category term="Linux" scheme="https://itgoyo.github.io/tags/Linux/"/>
    
  </entry>
  
  <entry>
    <title>2020跨年文案</title>
    <link href="https://itgoyo.github.io/2019/12/31/2020%E8%B7%A8%E5%B9%B4%E6%96%87%E6%A1%88/"/>
    <id>https://itgoyo.github.io/2019/12/31/2020跨年文案/</id>
    <published>2019-12-31T07:37:46.000Z</published>
    <updated>2020-01-02T05:54:06.006Z</updated>
    
    <content type="html"><![CDATA[<link rel="stylesheet" class="aplayer-secondary-style-marker" href="/assets/css/APlayer.min.css"><script src="/assets/js/APlayer.min.js" class="aplayer-secondary-script-marker"></script><p>2019对我来说是特别有意义的一年</p><p>饱受伤病的困扰的我在这一年逐渐恢复了</p><p>2020我要再活一次</p><p>人生终会有尽头</p><p>做些刻骨铭心的事</p><p>给后来人留下自己曾经来过的痕迹</p><p>慢慢恢复健身</p><p>家人身体健康</p><p>做YouTube channel</p><p>做B站视频</p><p>做一些以前没做过的事</p><p>转变自己的思维</p><p>2020计划：</p><p>姿势付费</p><p>断舍离</p><p>B站 10W粉丝</p><p>U2B 1000粉丝</p><p>搞自己的副业定个小目标1W</p><p>学会视频剪辑</p><p>学会PS</p><p>转Java开发</p><p>写365篇文章</p><p>个人IP</p><p>投资理财</p><p>看100本书</p><p>出100个视频</p><p>熟练使用Vim</p><p>熟练使用五笔</p><hr><div align="center"><br><br>        发现更多更好玩的，欢迎关注我的微信公众号:<span style="color:red;"> FullStacker </span><br><br>        <img src="/img/fullstacker.jpg" height="400px" width="400px"><br>    </div>]]></content>
    
    <summary type="html">


        &lt;link rel=&quot;stylesheet&quot; class=&quot;aplayer-secondary-style-marker&quot; href=&quot;/assets/css/APlayer.min.css&quot;&gt;&lt;script src=&quot;/assets/js/APlayer.min.js&quot; cla
      
    
    </summary>
    
      <category term="生活随笔" scheme="https://itgoyo.github.io/categories/%E7%94%9F%E6%B4%BB%E9%9A%8F%E7%AC%94/"/>
    
    
      <category term="生活随笔" scheme="https://itgoyo.github.io/tags/%E7%94%9F%E6%B4%BB%E9%9A%8F%E7%AC%94/"/>
    
  </entry>
  
  <entry>
    <title>Go语言数据类型</title>
    <link href="https://itgoyo.github.io/2019/12/03/Go%E8%AF%AD%E8%A8%80%E6%95%B0%E6%8D%AE%E7%B1%BB%E5%9E%8B/"/>
    <id>https://itgoyo.github.io/2019/12/03/Go语言数据类型/</id>
    <published>2019-12-03T11:09:43.000Z</published>
    <updated>2020-01-02T05:54:49.120Z</updated>
    
    <content type="html"><![CDATA[<link rel="stylesheet" class="aplayer-secondary-style-marker" href="/assets/css/APlayer.min.css"><script src="/assets/js/APlayer.min.js" class="aplayer-secondary-script-marker"></script><p>在 Go 编程语言中，数据类型用于声明函数和变量。</p><p>数据类型的出现是为了把数据分成所需内存大小不同的数据，编程的时候需要用大数据的时候才需要申请大内存，就可以充分利用内存。</p><p>Go 语言按类别有以下几种数据类型：</p><p>| 序号 | 类型和描述 |<br>| 1 | <strong>布尔型</strong><br>布尔型的值只可以是常量 true 或者 false。一个简单的例子：var b bool = true。 |<br>| 2 | <strong>数字类型</strong><br>整型 int 和浮点型 float32、float64，Go 语言支持整型和浮点型数字，并且支持复数，其中位的运算采用补码。 |<br>| 3 | <strong>字符串类型:</strong><br>字符串就是一串固定长度的字符连接起来的字符序列。Go 的字符串是由单个字节连接起来的。Go 语言的字符串的字节使用 UTF-8 编码标识 Unicode 文本。 |<br>| 4 | <strong>派生类型:</strong><br>包括：</p><ul><li>(a) 指针类型（Pointer）</li><li>(b) 数组类型</li><li>(c) 结构化类型 (struct)</li><li>(d) Channel 类型</li><li>(e) 函数类型</li><li>(f) 切片类型</li><li>(g) 接口类型（interface）</li><li><p>(h) Map 类型</p><p>|</p></li></ul><hr><h2 id="数字类型"><a href="#数字类型" class="headerlink" title="数字类型"></a>数字类型</h2><p>Go 也有基于架构的类型，例如：int、uint 和 uintptr。</p><p>| 序号 | 类型和描述 |<br>| 1 | <strong>uint8</strong><br>无符号 8 位整型 (0 到 255) |<br>| 2 | <strong>uint16</strong><br>无符号 16 位整型 (0 到 65535) |<br>| 3 | <strong>uint32</strong><br>无符号 32 位整型 (0 到 4294967295) |<br>| 4 | <strong>uint64</strong><br>无符号 64 位整型 (0 到 18446744073709551615) |<br>| 5 | <strong>int8</strong><br>有符号 8 位整型 (-128 到 127) |<br>| 6 | <strong>int16</strong><br>有符号 16 位整型 (-32768 到 32767) |<br>| 7 | <strong>int32</strong><br>有符号 32 位整型 (-2147483648 到 2147483647) |<br>| 8 | <strong>int64</strong><br>有符号 64 位整型 (-9223372036854775808 到 9223372036854775807) |</p><h3 id="浮点型"><a href="#浮点型" class="headerlink" title="浮点型"></a>浮点型</h3><p>| 序号 | 类型和描述 |<br>| 1 | <strong>float32</strong><br>IEEE-754 32 位浮点型数 |<br>| 2 | <strong>float64</strong><br>IEEE-754 64 位浮点型数 |<br>| 3 | <strong>complex64</strong><br>32 位实数和虚数 |<br>| 4 | <strong>complex128</strong><br>64 位实数和虚数 |</p><hr><h2 id="其他数字类型"><a href="#其他数字类型" class="headerlink" title="其他数字类型"></a>其他数字类型</h2><p>以下列出了其他更多的数字类型：</p><p>| 序号 | 类型和描述 |<br>| 1 | <strong>byte</strong><br>类似 uint8 |<br>| 2 | <strong>rune</strong><br>类似 int32 |<br>| 3 | <strong>uint</strong><br>32 或 64 位 |<br>| 4 | <strong>int</strong><br>与 uint 一样大小 |<br>| 5 | <strong>uintptr</strong><br>无符号整型，用于存放一个指针 |</p><hr><div align="center"><br><br>        发现更多更好玩的，欢迎关注我的微信公众号:<span style="color:red;"> FullStacker </span><br><br>        <img src="/img/fullstacker.jpg" height="400px" width="400px"><br>    </div>]]></content>
    
    <summary type="html">


        &lt;link rel=&quot;stylesheet&quot; class=&quot;aplayer-secondary-style-marker&quot; href=&quot;/assets/css/APlayer.min.css&quot;&gt;&lt;script src=&quot;/assets/js/APlayer.min.js&quot; cla
      
    
    </summary>
    
      <category term="Go" scheme="https://itgoyo.github.io/categories/Go/"/>
    
    
      <category term="Go" scheme="https://itgoyo.github.io/tags/Go/"/>
    
  </entry>
  
  <entry>
    <title>Go基础语法</title>
    <link href="https://itgoyo.github.io/2019/12/03/Go%E5%9F%BA%E7%A1%80%E8%AF%AD%E6%B3%95/"/>
    <id>https://itgoyo.github.io/2019/12/03/Go基础语法/</id>
    <published>2019-12-03T11:03:20.000Z</published>
    <updated>2020-01-02T05:54:33.969Z</updated>
    
    <content type="html"><![CDATA[<link rel="stylesheet" class="aplayer-secondary-style-marker" href="/assets/css/APlayer.min.css"><script src="/assets/js/APlayer.min.js" class="aplayer-secondary-script-marker"></script><h1 id="Go-语言基础语法"><a href="#Go-语言基础语法" class="headerlink" title="Go 语言基础语法"></a>Go 语言基础语法</h1><p>上一章节我们已经了解了 Go 语言的基本组成结构，本章节我们将学习 Go 语言的基础语法。</p><hr><h2 id="Go-标记"><a href="#Go-标记" class="headerlink" title="Go 标记"></a>Go 标记</h2><p>Go 程序可以由多个标记组成，可以是关键字，标识符，常量，字符串，符号。如以下 GO 语句由 6 个标记组成：</p><p>fmt.Println(“Hello, World!”)</p><p>6 个标记是 (每行一个)：</p><ol><li>fmt 2.  .  3.  Println  4.  (  5.  “Hello, World!”  6.  )</li></ol><hr><h2 id="行分隔符"><a href="#行分隔符" class="headerlink" title="行分隔符"></a>行分隔符</h2><p>在 Go 程序中，一行代表一个语句结束。每个语句不需要像 C 家族中的其它语言一样以分号；结尾，因为这些工作都将由 Go 编译器自动完成。</p><p>如果你打算将多个语句写在同一行，它们则必须使用；人为区分，但在实际开发中我们并不鼓励这种做法。</p><p>以下为两个语句：</p><p>fmt.Println(“Hello, World!”)<br>fmt.Println(“菜鸟教程：runoob.com”)</p><hr><h2 id="注释"><a href="#注释" class="headerlink" title="注释"></a>注释</h2><p>注释不会被编译，每一个包应该有相关注释。</p><p>单行注释是最常见的注释形式，你可以在任何地方使用以 // 开头的单行注释。多行注释也叫块注释，均已以 /<em> 开头，并以 </em>/ 结尾。如：</p><p>// 单行注释  /<em><br> Author by 菜鸟教程<br> 我是多行注释 </em>/</p><hr><h2 id="标识符"><a href="#标识符" class="headerlink" title="标识符"></a>标识符</h2><p>标识符用来命名变量、类型等程序实体。一个标识符实际上就是一个或是多个字母 (A~Z 和 a~z) 数字 (0~9)、下划线_组成的序列，但是第一个字符必须是字母或下划线而不能是数字。</p><p>以下是有效的标识符：</p><p>mahesh   kumar   abc   move_name   a_123<br>myname50   _temp   j   a23b9   retVal</p><p>以下是无效的标识符：</p><ul><li>1ab（以数字开头）</li><li>case（Go 语言的关键字）</li><li>a+b（运算符是不允许的）</li></ul><hr><h2 id="字符串连接"><a href="#字符串连接" class="headerlink" title="字符串连接"></a>字符串连接</h2><p>Go 语言的字符串可以通过 + 实现：</p><h2 id="实例"><a href="#实例" class="headerlink" title="实例"></a>实例</h2><p>package main<br>import “fmt”<br>func main() {<br>    fmt.Println(“Google” + “Runoob”)<br>}</p><p>以上实例输出结果为：</p><p>GoogleRunoob</p><hr><h2 id="关键字"><a href="#关键字" class="headerlink" title="关键字"></a>关键字</h2><p>下面列举了 Go 代码中会使用到的 25 个关键字或保留字：</p><p>| break | default | func | interface | select |<br>| case | defer | go | map | struct |<br>| chan | else | goto | package | switch |<br>| const | fallthrough | if | range | type |<br>| continue | for | import | return | var |</p><p>除了以上介绍的这些关键字，Go 语言还有 36 个预定义标识符：</p><p>| append | bool | byte | cap | close | complex | complex64 | complex128 | uint16 |<br>| copy | false | float32 | float64 | imag | int | int8 | int16 | uint32 |<br>| int32 | int64 | iota | len | make | new | nil | panic | uint64 |<br>| print | println | real | recover | string | true | uint | uint8 | uintptr |</p><p>程序一般由关键字、常量、变量、运算符、类型和函数组成。</p><p>程序中可能会使用到这些分隔符：括号 ()，中括号 [] 和大括号 {}。</p><p>程序中可能会使用到这些标点符号：.、,、;、: 和 …。</p><hr><h2 id="Go-语言的空格"><a href="#Go-语言的空格" class="headerlink" title="Go 语言的空格"></a>Go 语言的空格</h2><p>Go 语言中变量的声明必须使用空格隔开，如：</p><p>var age int;</p><p>语句中适当使用空格能让程序更易阅读。</p><p>无空格：</p><p>fruit=apples+oranges;</p><p>在变量与运算符间加入空格，程序看起来更加美观，如：</p><p>fruit = apples + oranges;</p><hr><div align="center"><br><br>        发现更多更好玩的，欢迎关注我的微信公众号:<span style="color:red;"> FullStacker </span><br><br>        <img src="/img/fullstacker.jpg" height="400px" width="400px"><br>    </div>]]></content>
    
    <summary type="html">


        &lt;link rel=&quot;stylesheet&quot; class=&quot;aplayer-secondary-style-marker&quot; href=&quot;/assets/css/APlayer.min.css&quot;&gt;&lt;script src=&quot;/assets/js/APlayer.min.js&quot; cla
      
    
    </summary>
    
      <category term="Go" scheme="https://itgoyo.github.io/categories/Go/"/>
    
    
      <category term="Go" scheme="https://itgoyo.github.io/tags/Go/"/>
    
  </entry>
  
  <entry>
    <title>Go简单入门</title>
    <link href="https://itgoyo.github.io/2019/12/02/Go%E7%AE%80%E5%8D%95%E5%85%A5%E9%97%A8/"/>
    <id>https://itgoyo.github.io/2019/12/02/Go简单入门/</id>
    <published>2019-12-02T03:45:13.000Z</published>
    <updated>2020-01-02T05:54:41.585Z</updated>
    
    <content type="html"><![CDATA[<link rel="stylesheet" class="aplayer-secondary-style-marker" href="/assets/css/APlayer.min.css"><script src="/assets/js/APlayer.min.js" class="aplayer-secondary-script-marker"></script><p>今天是一次做Go的笔记，一开始直接打开Github上的Go项目然后跑到Wiki位置，然后作者列出了一堆学习Go的资料，这里我<br>以第一个学习资料<a href="https://tour.golang.org/" target="_blank" rel="noopener">https://tour.golang.org/</a>作为Go学习到入门。然后为了训练我的终端运用<br>能力还有Vim下的编码能力这里我使用到了<code>tmux</code>和<code>Vim</code>编辑器，然后之前已经在VIM里面安装了<code>Vim-go</code>插件了，所以在之前<br>的Go项目文件目录下可以直接使用命令模式使用<code>:Go</code>来执行相应的操作。如果项目报错都话你可能是没有按照<br><code>Vim-go</code>的要求现在项目里面执行<code>:GoInstallBinaries</code>.</p><blockquote><p>
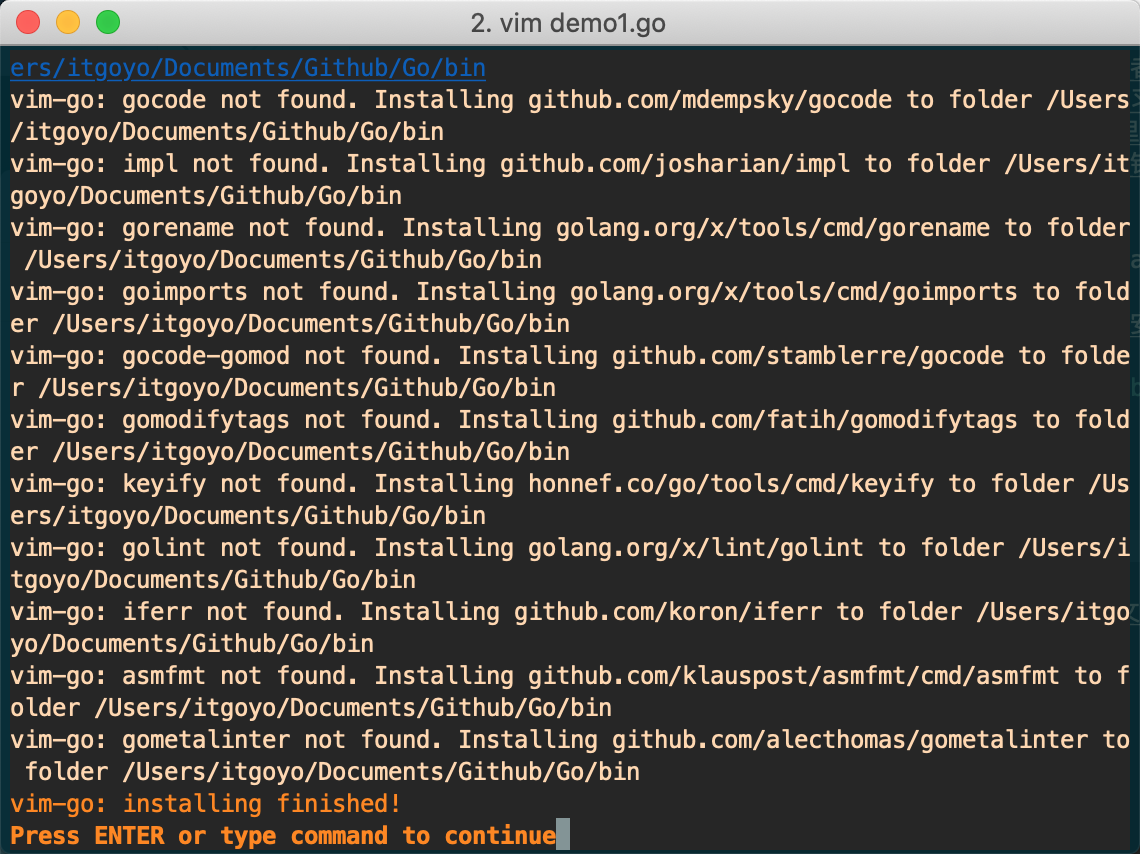
You will also need to install all the necessary binaries. vim-go makes it easy to install all of them by providing a command, :GoInstallBinaries, which will go get all the required binaries.</p></blockquote><p>但是由于但由于go的代码很多在github和golang.org上,涉及到墙的问题。自动安装可能会失败。当然你有梯子的话除外；我们可以手工安装，进入到GOPATH的SRC目录下，运行命令 <code>git clone https://github.com/golang/tools golang.org/x/tools</code>，再接着上一步<code>:GoInstallBinaries</code>即可<br>我的解决方式是先让终端邹代理，至于如何让终端走代理呢，无非就是<br><figure class="highlight plain"><table><tr><td class="gutter"><pre><span class="line">1</span><br><span class="line">2</span><br></pre></td><td class="code"><pre><span class="line">export http_proxy=http://127.0.0.1:12333</span><br><span class="line">export http_proxy=https://127.0.0.1:12333</span><br></pre></td></tr></table></figure></p><p>然后在通过命令打开vim，然后再<code>:GoInstallBinaries</code>，这样子就能下载Go所需要的文件了</p><p>最后出现如图所示：</p><p><img src="https://raw.githubusercontent.com/itgoyo/PicGoRes/master/img/20191202140158.png" width="800" height="600"></p><h3 id="项目一-Packages"><a href="#项目一-Packages" class="headerlink" title="项目一 Packages"></a>项目一 Packages</h3><figure class="highlight plain"><table><tr><td class="gutter"><pre><span class="line">1</span><br><span class="line">2</span><br><span class="line">3</span><br><span class="line">4</span><br><span class="line">5</span><br><span class="line">6</span><br><span class="line">7</span><br><span class="line">8</span><br><span class="line">9</span><br><span class="line">10</span><br></pre></td><td class="code"><pre><span class="line">package main</span><br><span class="line"></span><br><span class="line">import (</span><br><span class="line">&quot;fmt&quot;</span><br><span class="line">&quot;math/rand&quot;</span><br><span class="line">)</span><br><span class="line"></span><br><span class="line">func main() &#123;</span><br><span class="line">fmt.Println(&quot;My favorite number is&quot;, rand.Intn(10))</span><br><span class="line">&#125;</span><br></pre></td></tr></table></figure><p>然后在Vim下面执行<code>:Go Run</code>即可输出<br><figure class="highlight plain"><table><tr><td class="gutter"><pre><span class="line">1</span><br></pre></td><td class="code"><pre><span class="line">My favorite number is 1</span><br></pre></td></tr></table></figure></p><h3 id="项目二-Imports"><a href="#项目二-Imports" class="headerlink" title="项目二 Imports"></a>项目二 Imports</h3><figure class="highlight plain"><table><tr><td class="gutter"><pre><span class="line">1</span><br><span class="line">2</span><br><span class="line">3</span><br><span class="line">4</span><br><span class="line">5</span><br><span class="line">6</span><br><span class="line">7</span><br><span class="line">8</span><br><span class="line">9</span><br><span class="line">10</span><br></pre></td><td class="code"><pre><span class="line">package main</span><br><span class="line"></span><br><span class="line">import (</span><br><span class="line">&quot;fmt&quot;</span><br><span class="line">&quot;math&quot;</span><br><span class="line">)</span><br><span class="line"></span><br><span class="line">func main() &#123;</span><br><span class="line">fmt.Printf(&quot;Now you have %g problems.\n&quot;, math.Sqrt(7))</span><br><span class="line">&#125;</span><br></pre></td></tr></table></figure><p>输出<br><figure class="highlight plain"><table><tr><td class="gutter"><pre><span class="line">1</span><br></pre></td><td class="code"><pre><span class="line">Now you have 2.6457513110645907 problems.</span><br></pre></td></tr></table></figure></p><h3 id="项目三-Exported-names"><a href="#项目三-Exported-names" class="headerlink" title="项目三 Exported names"></a>项目三 Exported names</h3><p>In Go, a name is exported if it begins with a capital letter. For example, <code>Pizza</code> is an exported name, as is <code>Pi</code>, which is exported from the <code>math</code> package.</p><p><code>pizza</code> and <code>pi</code> do not start with a capital letter, so they are not exported.</p><p>When importing a package, you can refer only to its exported names. Any “unexported” names are not accessible from outside the package.</p><p>Run the code. Notice the error message.</p><p>To fix the error, rename <code>math.pi</code> to <code>math.Pi</code> and try it again.</p><figure class="highlight plain"><table><tr><td class="gutter"><pre><span class="line">1</span><br><span class="line">2</span><br><span class="line">3</span><br><span class="line">4</span><br><span class="line">5</span><br><span class="line">6</span><br><span class="line">7</span><br><span class="line">8</span><br><span class="line">9</span><br><span class="line">10</span><br></pre></td><td class="code"><pre><span class="line">package main</span><br><span class="line"></span><br><span class="line">import (</span><br><span class="line">&quot;fmt&quot;</span><br><span class="line">&quot;math&quot;</span><br><span class="line">)</span><br><span class="line"></span><br><span class="line">func main() &#123;</span><br><span class="line">fmt.Println(math.pi)</span><br><span class="line">&#125;</span><br></pre></td></tr></table></figure><p>输出<br><figure class="highlight plain"><table><tr><td class="gutter"><pre><span class="line">1</span><br></pre></td><td class="code"><pre><span class="line">3.141592653589793</span><br></pre></td></tr></table></figure></p><h3 id="项目四-Functions"><a href="#项目四-Functions" class="headerlink" title="项目四 Functions"></a>项目四 Functions</h3><p>A function can take zero or more arguments.</p><p>In this example, <code>add</code> takes two parameters of type <code>int</code>.</p><p>Notice that the type comes <em>after</em> the variable name.</p><p>(For more about why types look the way they do, see the <a href="https://blog.golang.org/gos-declaration-syntax" target="_blank" rel="noopener">article on Go’s declaration syntax</a>.)</p><figure class="highlight plain"><table><tr><td class="gutter"><pre><span class="line">1</span><br><span class="line">2</span><br><span class="line">3</span><br><span class="line">4</span><br><span class="line">5</span><br><span class="line">6</span><br><span class="line">7</span><br><span class="line">8</span><br><span class="line">9</span><br><span class="line">10</span><br><span class="line">11</span><br></pre></td><td class="code"><pre><span class="line">package main</span><br><span class="line"></span><br><span class="line">import &quot;fmt&quot;</span><br><span class="line"></span><br><span class="line">func add(x int, y int) int &#123;</span><br><span class="line">return x + y</span><br><span class="line">&#125;</span><br><span class="line"></span><br><span class="line">func main() &#123;</span><br><span class="line">fmt.Println(add(42, 13))</span><br><span class="line">&#125;</span><br></pre></td></tr></table></figure><p>输出<br><figure class="highlight plain"><table><tr><td class="gutter"><pre><span class="line">1</span><br></pre></td><td class="code"><pre><span class="line">55</span><br></pre></td></tr></table></figure></p><h3 id="项目五-Functions-continued"><a href="#项目五-Functions-continued" class="headerlink" title="项目五 Functions continued"></a>项目五 Functions continued</h3><p>When two or more consecutive named function parameters share a type, you can omit the type from all but the last.</p><p>In this example, we shortened</p><p>x int, y int</p><p>to</p><p>x, y int</p><figure class="highlight plain"><table><tr><td class="gutter"><pre><span class="line">1</span><br><span class="line">2</span><br><span class="line">3</span><br><span class="line">4</span><br><span class="line">5</span><br><span class="line">6</span><br><span class="line">7</span><br><span class="line">8</span><br><span class="line">9</span><br><span class="line">10</span><br><span class="line">11</span><br></pre></td><td class="code"><pre><span class="line">package main</span><br><span class="line"></span><br><span class="line">import &quot;fmt&quot;</span><br><span class="line"></span><br><span class="line">func add(x, y int) int &#123;</span><br><span class="line">return x + y</span><br><span class="line">&#125;</span><br><span class="line"></span><br><span class="line">func main() &#123;</span><br><span class="line">fmt.Println(add(42, 13))</span><br><span class="line">&#125;</span><br></pre></td></tr></table></figure><p>输出<br><figure class="highlight plain"><table><tr><td class="gutter"><pre><span class="line">1</span><br></pre></td><td class="code"><pre><span class="line">55</span><br></pre></td></tr></table></figure></p><h3 id="项目六-Multiple-results"><a href="#项目六-Multiple-results" class="headerlink" title="项目六 Multiple results"></a>项目六 Multiple results</h3><p>A function can return any number of results.</p><p>The <code>swap</code> function returns two strings.</p><figure class="highlight plain"><table><tr><td class="gutter"><pre><span class="line">1</span><br><span class="line">2</span><br><span class="line">3</span><br><span class="line">4</span><br><span class="line">5</span><br><span class="line">6</span><br><span class="line">7</span><br><span class="line">8</span><br><span class="line">9</span><br><span class="line">10</span><br><span class="line">11</span><br><span class="line">12</span><br></pre></td><td class="code"><pre><span class="line">package main</span><br><span class="line"></span><br><span class="line">import &quot;fmt&quot;</span><br><span class="line"></span><br><span class="line">func swap(x, y string) (string, string) &#123;</span><br><span class="line">return y, x</span><br><span class="line">&#125;</span><br><span class="line"></span><br><span class="line">func main() &#123;</span><br><span class="line">a, b := swap(&quot;hello&quot;, &quot;world&quot;)</span><br><span class="line">fmt.Println(a, b)</span><br><span class="line">&#125;</span><br></pre></td></tr></table></figure><p>输出<br><figure class="highlight plain"><table><tr><td class="gutter"><pre><span class="line">1</span><br></pre></td><td class="code"><pre><span class="line">world hello</span><br></pre></td></tr></table></figure></p><h3 id="项目七-Named-return-values"><a href="#项目七-Named-return-values" class="headerlink" title="项目七 Named return values"></a>项目七 Named return values</h3><p>Go’s return values may be named. If so, they are treated as variables defined at the top of the function.</p><p>These names should be used to document the meaning of the return values.</p><p>A return statement without arguments returns the named return values. This is known as a “naked” return.</p><p>Naked return statements should be used only in short functions, as with the example shown here. They can harm readability in longer functions.</p><figure class="highlight plain"><table><tr><td class="gutter"><pre><span class="line">1</span><br><span class="line">2</span><br><span class="line">3</span><br><span class="line">4</span><br><span class="line">5</span><br><span class="line">6</span><br><span class="line">7</span><br><span class="line">8</span><br><span class="line">9</span><br><span class="line">10</span><br><span class="line">11</span><br><span class="line">12</span><br><span class="line">13</span><br></pre></td><td class="code"><pre><span class="line">package main</span><br><span class="line"></span><br><span class="line">import &quot;fmt&quot;</span><br><span class="line"></span><br><span class="line">func split(sum int) (x, y int) &#123;</span><br><span class="line">x = sum * 4 / 9</span><br><span class="line">y = sum - x</span><br><span class="line">return</span><br><span class="line">&#125;</span><br><span class="line"></span><br><span class="line">func main() &#123;</span><br><span class="line">fmt.Println(split(17))</span><br><span class="line">&#125;</span><br></pre></td></tr></table></figure><p>输出<br><figure class="highlight plain"><table><tr><td class="gutter"><pre><span class="line">1</span><br></pre></td><td class="code"><pre><span class="line">7 10</span><br></pre></td></tr></table></figure></p><h3 id="项目八-Variables"><a href="#项目八-Variables" class="headerlink" title="项目八 Variables"></a>项目八 Variables</h3><p>The <code>var</code> statement declares a list of variables; as in function argument lists, the type is last.</p><p>A <code>var</code> statement can be at package or function level. We see both in this example.</p><figure class="highlight plain"><table><tr><td class="gutter"><pre><span class="line">1</span><br><span class="line">2</span><br><span class="line">3</span><br><span class="line">4</span><br><span class="line">5</span><br><span class="line">6</span><br><span class="line">7</span><br><span class="line">8</span><br><span class="line">9</span><br><span class="line">10</span><br></pre></td><td class="code"><pre><span class="line">package main</span><br><span class="line"></span><br><span class="line">import &quot;fmt&quot;</span><br><span class="line"></span><br><span class="line">var c, python, java bool</span><br><span class="line"></span><br><span class="line">func main() &#123;</span><br><span class="line">var i int</span><br><span class="line">fmt.Println(i, c, python, java)</span><br><span class="line">&#125;</span><br></pre></td></tr></table></figure><p>输出<br><figure class="highlight plain"><table><tr><td class="gutter"><pre><span class="line">1</span><br></pre></td><td class="code"><pre><span class="line">0 false false false</span><br></pre></td></tr></table></figure></p><h3 id="项目九-Variables-with-initializers"><a href="#项目九-Variables-with-initializers" class="headerlink" title="项目九 Variables with initializers"></a>项目九 Variables with initializers</h3><p>A var declaration can include initializers, one per variable.</p><p>If an initializer is present, the type can be omitted; the variable will take the type of the initializer.</p><figure class="highlight plain"><table><tr><td class="gutter"><pre><span class="line">1</span><br><span class="line">2</span><br><span class="line">3</span><br><span class="line">4</span><br><span class="line">5</span><br><span class="line">6</span><br><span class="line">7</span><br><span class="line">8</span><br><span class="line">9</span><br><span class="line">10</span><br></pre></td><td class="code"><pre><span class="line">package main</span><br><span class="line"></span><br><span class="line">import &quot;fmt&quot;</span><br><span class="line"></span><br><span class="line">var i, j int = 1, 2</span><br><span class="line"></span><br><span class="line">func main() &#123;</span><br><span class="line">var c, python, java = true, false, &quot;no!&quot;</span><br><span class="line">fmt.Println(i, j, c, python, java)</span><br><span class="line">&#125;</span><br></pre></td></tr></table></figure><p>输出<br><figure class="highlight plain"><table><tr><td class="gutter"><pre><span class="line">1</span><br></pre></td><td class="code"><pre><span class="line">1 2 true false no!</span><br></pre></td></tr></table></figure></p><h3 id="项目十-Short-variable-declarations"><a href="#项目十-Short-variable-declarations" class="headerlink" title="项目十 Short variable declarations"></a>项目十 Short variable declarations</h3><p>Inside a function, the <code>:=</code> short assignment statement can be used in place of a <code>var</code> declaration with implicit type.</p><p>Outside a function, every statement begins with a keyword (<code>var</code>, <code>func</code>, and so on) and so the <code>:=</code> construct is not available.</p><figure class="highlight plain"><table><tr><td class="gutter"><pre><span class="line">1</span><br><span class="line">2</span><br><span class="line">3</span><br><span class="line">4</span><br><span class="line">5</span><br><span class="line">6</span><br><span class="line">7</span><br><span class="line">8</span><br><span class="line">9</span><br><span class="line">10</span><br><span class="line">11</span><br></pre></td><td class="code"><pre><span class="line">package main</span><br><span class="line"></span><br><span class="line">import &quot;fmt&quot;</span><br><span class="line"></span><br><span class="line">func main() &#123;</span><br><span class="line">var i, j int = 1, 2</span><br><span class="line">k := 3</span><br><span class="line">c, python, java := true, false, &quot;no!&quot;</span><br><span class="line"></span><br><span class="line">fmt.Println(i, j, k, c, python, java)</span><br><span class="line">&#125;</span><br></pre></td></tr></table></figure><p>输出<br><figure class="highlight plain"><table><tr><td class="gutter"><pre><span class="line">1</span><br></pre></td><td class="code"><pre><span class="line">1 2 3 true false no!</span><br></pre></td></tr></table></figure></p><h3 id="项目十一Basic-types"><a href="#项目十一Basic-types" class="headerlink" title="项目十一Basic types"></a>项目十一Basic types</h3><p>Go’s basic types are</p><p>bool</p><p>string</p><p>int  int8  int16  int32  int64<br>uint uint8 uint16 uint32 uint64 uintptr</p><p>byte // alias for uint8</p><p>rune // alias for int32<br>     // represents a Unicode code point</p><p>float32 float64</p><p>complex64 complex128</p><p>The example shows variables of several types, and also that variable declarations may be “factored” into blocks, as with import statements.</p><p>The <code>int</code>, <code>uint</code>, and <code>uintptr</code> types are usually 32 bits wide on 32-bit systems and 64 bits wide on 64-bit systems. When you need an integer value you should use <code>int</code> unless you have a specific reason to use a sized or unsigned integer type.</p><figure class="highlight plain"><table><tr><td class="gutter"><pre><span class="line">1</span><br><span class="line">2</span><br><span class="line">3</span><br><span class="line">4</span><br><span class="line">5</span><br><span class="line">6</span><br><span class="line">7</span><br><span class="line">8</span><br><span class="line">9</span><br><span class="line">10</span><br><span class="line">11</span><br><span class="line">12</span><br><span class="line">13</span><br><span class="line">14</span><br><span class="line">15</span><br><span class="line">16</span><br><span class="line">17</span><br><span class="line">18</span><br></pre></td><td class="code"><pre><span class="line">package main</span><br><span class="line"></span><br><span class="line">import (</span><br><span class="line">&quot;fmt&quot;</span><br><span class="line">&quot;math/cmplx&quot;</span><br><span class="line">)</span><br><span class="line"></span><br><span class="line">var (</span><br><span class="line">ToBe   bool       = false</span><br><span class="line">MaxInt uint64     = 1&lt;&lt;64 - 1</span><br><span class="line">z      complex128 = cmplx.Sqrt(-5 + 12i)</span><br><span class="line">)</span><br><span class="line"></span><br><span class="line">func main() &#123;</span><br><span class="line">fmt.Printf(&quot;Type: %T Value: %v\n&quot;, ToBe, ToBe)</span><br><span class="line">fmt.Printf(&quot;Type: %T Value: %v\n&quot;, MaxInt, MaxInt)</span><br><span class="line">fmt.Printf(&quot;Type: %T Value: %v\n&quot;, z, z)</span><br><span class="line">&#125;</span><br></pre></td></tr></table></figure><p>输出<br><figure class="highlight plain"><table><tr><td class="gutter"><pre><span class="line">1</span><br><span class="line">2</span><br><span class="line">3</span><br></pre></td><td class="code"><pre><span class="line">Type: bool Value: false</span><br><span class="line">Type: uint64 Value: 18446744073709551615</span><br><span class="line">Type: complex128 Value: (2+3i)</span><br></pre></td></tr></table></figure></p><h3 id="项目十二-Zero-values"><a href="#项目十二-Zero-values" class="headerlink" title="项目十二 Zero values"></a>项目十二 Zero values</h3><p>Variables declared without an explicit initial value are given their <em>zero value</em>.</p><p>The zero value is:</p><ul><li><code>0</code> for numeric types,</li><li><code>false</code> for the boolean type, and</li><li><code>&quot;&quot;</code> (the empty string) for strings.</li></ul><figure class="highlight plain"><table><tr><td class="gutter"><pre><span class="line">1</span><br><span class="line">2</span><br><span class="line">3</span><br><span class="line">4</span><br><span class="line">5</span><br><span class="line">6</span><br><span class="line">7</span><br><span class="line">8</span><br><span class="line">9</span><br><span class="line">10</span><br><span class="line">11</span><br></pre></td><td class="code"><pre><span class="line">package main</span><br><span class="line"></span><br><span class="line">import &quot;fmt&quot;</span><br><span class="line"></span><br><span class="line">func main() &#123;</span><br><span class="line">var i int</span><br><span class="line">var f float64</span><br><span class="line">var b bool</span><br><span class="line">var s string</span><br><span class="line">fmt.Printf(&quot;%v %v %v %q\n&quot;, i, f, b, s)</span><br><span class="line">&#125;</span><br></pre></td></tr></table></figure><p>输出<br><figure class="highlight plain"><table><tr><td class="gutter"><pre><span class="line">1</span><br></pre></td><td class="code"><pre><span class="line">0 0 false &quot;&quot;</span><br></pre></td></tr></table></figure></p><h3 id="项目十三-Type-conversions"><a href="#项目十三-Type-conversions" class="headerlink" title="项目十三 Type conversions"></a>项目十三 Type conversions</h3><p>The expression <code>T(v)</code> converts the value <code>v</code> to the type <code>T</code>.</p><p>Some numeric conversions:</p><p>var i int = 42<br>var f float64 = float64(i)<br>var u uint = uint(f)</p><p>Or, put more simply:</p><p>i := 42<br>f := float64(i)<br>u := uint(f)</p><p>Unlike in C, in Go assignment between items of different type requires an explicit conversion. Try removing the <code>float64</code> or <code>uint</code> conversions in the example and see what happens.</p><figure class="highlight plain"><table><tr><td class="gutter"><pre><span class="line">1</span><br><span class="line">2</span><br><span class="line">3</span><br><span class="line">4</span><br><span class="line">5</span><br><span class="line">6</span><br><span class="line">7</span><br><span class="line">8</span><br><span class="line">9</span><br><span class="line">10</span><br><span class="line">11</span><br><span class="line">12</span><br><span class="line">13</span><br></pre></td><td class="code"><pre><span class="line">package main</span><br><span class="line"></span><br><span class="line">import (</span><br><span class="line">&quot;fmt&quot;</span><br><span class="line">&quot;math&quot;</span><br><span class="line">)</span><br><span class="line"></span><br><span class="line">func main() &#123;</span><br><span class="line">var x, y int = 3, 4</span><br><span class="line">var f float64 = math.Sqrt(float64(x*x + y*y))</span><br><span class="line">var z uint = uint(f)</span><br><span class="line">fmt.Println(x, y, z)</span><br><span class="line">&#125;</span><br></pre></td></tr></table></figure><p>输出<br><figure class="highlight plain"><table><tr><td class="gutter"><pre><span class="line">1</span><br></pre></td><td class="code"><pre><span class="line">3 4 5</span><br></pre></td></tr></table></figure></p><h3 id="项目十四-Type-inference"><a href="#项目十四-Type-inference" class="headerlink" title="项目十四 Type inference"></a>项目十四 Type inference</h3><p>When declaring a variable without specifying an explicit type (either by using the <code>:=</code> syntax or <code>var =</code> expression syntax), the variable’s type is inferred from the value on the right hand side.</p><p>When the right hand side of the declaration is typed, the new variable is of that same type:</p><p>var i int<br>j := i // j is an int</p><p>But when the right hand side contains an untyped numeric constant, the new variable may be an <code>int</code>, <code>float64</code>, or <code>complex128</code> depending on the precision of the constant:</p><p>i := 42           // int<br>f := 3.142        // float64<br>g := 0.867 + 0.5i // complex128</p><p>Try changing the initial value of <code>v</code> in the example code and observe how its type is affected.</p><figure class="highlight plain"><table><tr><td class="gutter"><pre><span class="line">1</span><br><span class="line">2</span><br><span class="line">3</span><br><span class="line">4</span><br><span class="line">5</span><br><span class="line">6</span><br><span class="line">7</span><br><span class="line">8</span><br></pre></td><td class="code"><pre><span class="line">package main</span><br><span class="line"></span><br><span class="line">import &quot;fmt&quot;</span><br><span class="line"></span><br><span class="line">func main() &#123;</span><br><span class="line">v := 42 // change me!</span><br><span class="line">fmt.Printf(&quot;v is of type %T\n&quot;, v)</span><br><span class="line">&#125;</span><br></pre></td></tr></table></figure><p>输出<br><figure class="highlight plain"><table><tr><td class="gutter"><pre><span class="line">1</span><br></pre></td><td class="code"><pre><span class="line">v is of type int</span><br></pre></td></tr></table></figure></p><h3 id="项目十五-Constants"><a href="#项目十五-Constants" class="headerlink" title="项目十五 Constants"></a>项目十五 Constants</h3><p>Constants are declared like variables, but with the <code>const</code> keyword.</p><p>Constants can be character, string, boolean, or numeric values.</p><p>Constants cannot be declared using the <code>:=</code> syntax.</p><figure class="highlight plain"><table><tr><td class="gutter"><pre><span class="line">1</span><br><span class="line">2</span><br><span class="line">3</span><br><span class="line">4</span><br><span class="line">5</span><br><span class="line">6</span><br><span class="line">7</span><br><span class="line">8</span><br><span class="line">9</span><br><span class="line">10</span><br><span class="line">11</span><br><span class="line">12</span><br><span class="line">13</span><br><span class="line">14</span><br></pre></td><td class="code"><pre><span class="line">package main</span><br><span class="line"></span><br><span class="line">import &quot;fmt&quot;</span><br><span class="line"></span><br><span class="line">const Pi = 3.14</span><br><span class="line"></span><br><span class="line">func main() &#123;</span><br><span class="line">const World = &quot;世界&quot;</span><br><span class="line">fmt.Println(&quot;Hello&quot;, World)</span><br><span class="line">fmt.Println(&quot;Happy&quot;, Pi, &quot;Day&quot;)</span><br><span class="line"></span><br><span class="line">const Truth = true</span><br><span class="line">fmt.Println(&quot;Go rules?&quot;, Truth)</span><br><span class="line">&#125;</span><br></pre></td></tr></table></figure><p>输出<br><figure class="highlight plain"><table><tr><td class="gutter"><pre><span class="line">1</span><br><span class="line">2</span><br><span class="line">3</span><br></pre></td><td class="code"><pre><span class="line">Hello 世界</span><br><span class="line">Happy 3.14 Day</span><br><span class="line">Go rules? true</span><br></pre></td></tr></table></figure></p><h3 id="项目十六-Numeric-Constants"><a href="#项目十六-Numeric-Constants" class="headerlink" title="项目十六 Numeric Constants"></a>项目十六 Numeric Constants</h3><p>Numeric constants are high-precision <em>values</em>.</p><p>An untyped constant takes the type needed by its context.</p><p>Try printing <code>needInt(Big)</code> too.</p><p>(An <code>int</code> can store at maximum a 64-bit integer, and sometimes less.)</p><figure class="highlight plain"><table><tr><td class="gutter"><pre><span class="line">1</span><br><span class="line">2</span><br><span class="line">3</span><br><span class="line">4</span><br><span class="line">5</span><br><span class="line">6</span><br><span class="line">7</span><br><span class="line">8</span><br><span class="line">9</span><br><span class="line">10</span><br><span class="line">11</span><br><span class="line">12</span><br><span class="line">13</span><br><span class="line">14</span><br><span class="line">15</span><br><span class="line">16</span><br><span class="line">17</span><br><span class="line">18</span><br><span class="line">19</span><br><span class="line">20</span><br><span class="line">21</span><br><span class="line">22</span><br></pre></td><td class="code"><pre><span class="line">package main</span><br><span class="line"></span><br><span class="line">import &quot;fmt&quot;</span><br><span class="line"></span><br><span class="line">const (</span><br><span class="line">// Create a huge number by shifting a 1 bit left 100 places.</span><br><span class="line">// In other words, the binary number that is 1 followed by 100 zeroes.</span><br><span class="line">Big = 1 &lt;&lt; 100</span><br><span class="line">// Shift it right again 99 places, so we end up with 1&lt;&lt;1, or 2.</span><br><span class="line">Small = Big &gt;&gt; 99</span><br><span class="line">)</span><br><span class="line"></span><br><span class="line">func needInt(x int) int &#123; return x*10 + 1 &#125;</span><br><span class="line">func needFloat(x float64) float64 &#123;</span><br><span class="line">return x * 0.1</span><br><span class="line">&#125;</span><br><span class="line"></span><br><span class="line">func main() &#123;</span><br><span class="line">fmt.Println(needInt(Small))</span><br><span class="line">fmt.Println(needFloat(Small))</span><br><span class="line">fmt.Println(needFloat(Big))</span><br><span class="line">&#125;</span><br></pre></td></tr></table></figure><p>输出<br><figure class="highlight plain"><table><tr><td class="gutter"><pre><span class="line">1</span><br><span class="line">2</span><br><span class="line">3</span><br></pre></td><td class="code"><pre><span class="line">21</span><br><span class="line">0.2</span><br><span class="line">1.2676506002282295e+29</span><br></pre></td></tr></table></figure></p><h3 id="Congratulations"><a href="#Congratulations" class="headerlink" title="Congratulations!"></a>Congratulations!</h3><p>You finished this lesson!</p><p>You can go back to the list of <a href="https://tour.golang.org/list" target="_blank" rel="noopener">modules</a> to find what to learn next, or continue with the next lesson</p><hr><div align="center"><br><br>        发现更多更好玩的，欢迎关注我的微信公众号:<span style="color:red;"> FullStacker </span><br><br>        <img src="/img/fullstacker.jpg" height="400px" width="400px"><br>    </div>]]></content>
    
    <summary type="html">


        &lt;link rel=&quot;stylesheet&quot; class=&quot;aplayer-secondary-style-marker&quot; href=&quot;/assets/css/APlayer.min.css&quot;&gt;&lt;script src=&quot;/assets/js/APlayer.min.js&quot; cla
      
    
    </summary>
    
      <category term="Go" scheme="https://itgoyo.github.io/categories/Go/"/>
    
    
      <category term="Go" scheme="https://itgoyo.github.io/tags/Go/"/>
    
  </entry>
  
  <entry>
    <title>没有音频输出的解决方式</title>
    <link href="https://itgoyo.github.io/2019/11/29/%E6%B2%A1%E6%9C%89%E9%9F%B3%E9%A2%91%E8%BE%93%E5%87%BA%E7%9A%84%E8%A7%A3%E5%86%B3%E6%96%B9%E5%BC%8F/"/>
    <id>https://itgoyo.github.io/2019/11/29/没有音频输出的解决方式/</id>
    <published>2019-11-29T08:21:48.000Z</published>
    <updated>2020-01-02T05:51:32.456Z</updated>
    
    <content type="html"><![CDATA[<link rel="stylesheet" class="aplayer-secondary-style-marker" href="/assets/css/APlayer.min.css"><script src="/assets/js/APlayer.min.js" class="aplayer-secondary-script-marker"></script><p>用户级别的～/.asoundrc 文件。</p><p>如果文件不存在，可以手动创建。</p><p>其中的各个 ID，请根据实际情况调整：<br><figure class="highlight plain"><table><tr><td class="gutter"><pre><span class="line">1</span><br><span class="line">2</span><br><span class="line">3</span><br></pre></td><td class="code"><pre><span class="line">defaults.pcm.card 1</span><br><span class="line">defaults.pcm.device 0</span><br><span class="line">defaults.ctl.card 1</span><br></pre></td></tr></table></figure></p><p>重启电脑之后就马上有声音了</p><p>OBS无法捕获系统声音解决方式：<br>打开<code>pulseaudio</code>然后自行调节，然后重启OBS之后即可捕获到系统的声音，不知道是音频管理软件的原因还是重启OBS的原因，反正现在是能正常录制电脑声音了。</p><hr><div align="center"><br><br>        发现更多更好玩的，欢迎关注我的微信公众号:<span style="color:red;"> FullStacker </span><br><br>        <img src="/img/fullstacker.jpg" height="400px" width="400px"><br>    </div>]]></content>
    
    <summary type="html">


        &lt;link rel=&quot;stylesheet&quot; class=&quot;aplayer-secondary-style-marker&quot; href=&quot;/assets/css/APlayer.min.css&quot;&gt;&lt;script src=&quot;/assets/js/APlayer.min.js&quot; cla
      
    
    </summary>
    
      <category term="Linux" scheme="https://itgoyo.github.io/categories/Linux/"/>
    
    
      <category term="Linux" scheme="https://itgoyo.github.io/tags/Linux/"/>
    
  </entry>
  
  <entry>
    <title>Linux下面OBS支持Nvenc了</title>
    <link href="https://itgoyo.github.io/2019/11/25/Linux%E4%B8%8B%E9%9D%A2OBS%E6%94%AF%E6%8C%81Nvenc%E4%BA%86/"/>
    <id>https://itgoyo.github.io/2019/11/25/Linux下面OBS支持Nvenc了/</id>
    <published>2019-11-25T06:43:23.000Z</published>
    <updated>2020-01-02T05:55:44.896Z</updated>
    
    <content type="html"><![CDATA[<link rel="stylesheet" class="aplayer-secondary-style-marker" href="/assets/css/APlayer.min.css"><script src="/assets/js/APlayer.min.js" class="aplayer-secondary-script-marker"></script><p>B站视频链接：<a href="https://www.bilibili.com/video/av76908308" target="_blank" rel="noopener">https://www.bilibili.com/video/av76908308</a></p><blockquote><p>之前双十一期间搞了一台二手主机，然后安装了Linux系统用来当作平时录制Linux的工具</p></blockquote><h3 id="硬件信息"><a href="#硬件信息" class="headerlink" title="硬件信息"></a>硬件信息</h3><ul><li>CPU：I5-4590</li><li>内存：光威 DDR3 1600Hz + 金士顿骇客神条DDR3 1600Hz</li><li>金士顿120G SSD</li><li>主板：技嘉B85M-D3V-Plus-SI</li><li>显卡：750TI</li></ul><h3 id="系统信息"><a href="#系统信息" class="headerlink" title="系统信息"></a>系统信息</h3><ul><li>Linuxmint 19.2 Tina</li></ul><h3 id="刻盘工具"><a href="#刻盘工具" class="headerlink" title="刻盘工具"></a>刻盘工具</h3><ul><li>Fedora LiveUSB Creator</li></ul><p>安装完系统之后打开<code>nvidia driver</code>然后发现里面自带有英伟达最新的显卡驱动<code>Nvidia 435.21</code>，然后直接启动了</p><h3 id="PS！！！"><a href="#PS！！！" class="headerlink" title="PS！！！"></a>PS！！！</h3><p>本人之前一直没有成功使用OBS的<code>Nvenc</code>功能，之前失败一次是，安装了Nvidia 430，然后直接黑屏，后面好像是切换成Nvidia 418才解决的问题，安装Nvenc的时候最好留心一下，因为你装完驱动之后，你可能会进入不了系统，只能进入<code>tty</code>模式进去删英伟达驱动，之前我就是被这个东西搞得想死。</p><p>后面通过snap来安装<code>obs-studio</code>，因为通过这个方法安装的<code>obs-studio</code>是支持Nvenc硬件编码的，默认从官网上下载的却不行。</p><p>安装软件的命令</p><p><code>sudo apt-get install snapd</code></p><p><code>snap install obs-studio</code></p><p><code>snap install obs-studio</code> //启动obs，或者你如果安装了rofi可以直接搜obs,或者在应用列表里面自己找</p><p>感受：录制比之前的要清晰不少，而且没有感觉到一边录制一遍操作电脑有任何的卡顿，还是硬件编码比较牛逼</p><hr><div align="center"><br><br>        发现更多更好玩的，欢迎关注我的微信公众号:<span style="color:red;"> FullStacker </span><br><br>        <img src="/img/fullstacker.jpg" height="400px" width="400px"><br>    </div>]]></content>
    
    <summary type="html">


        &lt;link rel=&quot;stylesheet&quot; class=&quot;aplayer-secondary-style-marker&quot; href=&quot;/assets/css/APlayer.min.css&quot;&gt;&lt;script src=&quot;/assets/js/APlayer.min.js&quot; cla
      
    
    </summary>
    
      <category term="Linux" scheme="https://itgoyo.github.io/categories/Linux/"/>
    
    
      <category term="Linux" scheme="https://itgoyo.github.io/tags/Linux/"/>
    
  </entry>
  
  <entry>
    <title>驱动出现的黑屏各种问题和解决方式</title>
    <link href="https://itgoyo.github.io/2019/10/30/%E9%A9%B1%E5%8A%A8%E5%87%BA%E7%8E%B0%E7%9A%84%E9%BB%91%E5%B1%8F%E5%90%84%E7%A7%8D%E9%97%AE%E9%A2%98%E5%92%8C%E8%A7%A3%E5%86%B3%E6%96%B9%E5%BC%8F/"/>
    <id>https://itgoyo.github.io/2019/10/30/驱动出现的黑屏各种问题和解决方式/</id>
    <published>2019-10-30T02:51:01.000Z</published>
    <updated>2020-01-02T05:51:32.438Z</updated>
    
    <content type="html"><![CDATA[<link rel="stylesheet" class="aplayer-secondary-style-marker" href="/assets/css/APlayer.min.css"><script src="/assets/js/APlayer.min.js" class="aplayer-secondary-script-marker"></script><p>之前因为想<code>OBS</code>支持<code>h264-nvenc</code>这个功能然后就编译ffmpeg，然后使用<code>Github</code>上面的一个编译<a href="[https://github.com/lutris/ffmpeg-nvenc](https://github.com/lutris/ffmpeg-nvenc">项目</a>)，项目编译完成之后重启电脑，然后就进入不了系统的登录页面了，选择进入Linux系统之后就一直黑屏，最后不知道什么原因，只能重装，花了我一个晚上弄才把<code>i3-wm</code>桌面弄好，真的不想再来一次了。</p><p>在重新安装<code>linux-mint</code>的过程中有几个值得注意的点：</p><ul><li>引导项安装在 windows和Mac在的盘符（启动的时候可以直接引导）</li><li>安装完配置之后很有必要备份一下系统，这样子下次系统出现问题之后就可以快速恢复到原先备份时候的样子</li></ul><p>然后昨天晚上自己又不死心，既然通过<code>snap install obs-studio</code>安装的OBS支持<code>nvenc</code>的功能，然后就想着更新<code>nvidia</code>驱动或许能够解决现有不能使用<code>h264</code>硬件编码的问题，然后使用<code>apt search nvidia</code>，找到最新版本的<code>nvidia-430</code>,然后使用<code>sudo apt-get install nvidia-430</code>直接安装最新版本的英伟达显卡驱动，安装完之后重启系统，很好！系统又重新黑屏了。</p><p>最后<code>Google</code>出来的解决方式是进入<code>linux recover mode</code>使用root账号登陆之后卸载所有的英伟达驱动即可。<br><figure class="highlight shell"><table><tr><td class="gutter"><pre><span class="line">1</span><br><span class="line">2</span><br><span class="line">3</span><br></pre></td><td class="code"><pre><span class="line">sudo apt-get remove --purge nvidia*</span><br><span class="line"></span><br><span class="line">sudo reboot</span><br></pre></td></tr></table></figure></p><p>中间使用命令的过程中可能会出现没有权限的提示<code>xxx is not in the sudoers file. This incident will be reported</code><br>的错误，解决方法就是在<code>/etc/sudoers</code>文件里给用户添加权限，此时如果我们直接输入命令<code>chmod u+w /etc/sudoers</code><br>会报错如下：<br><img src="https://raw.githubusercontent.com/itgoyo/PicGoRes/master/img/20191030093012.png" alt=""></p><p>此时我们在窗口输入命令：<br><figure class="highlight shell"><table><tr><td class="gutter"><pre><span class="line">1</span><br></pre></td><td class="code"><pre><span class="line">moount -o remount,rw /</span><br></pre></td></tr></table></figure></p><p>(这里是重新挂载/etc分区，我的/etc是在跟目录下 所以是对/目录重新挂载为读/写)，再输入命令<br><figure class="highlight shell"><table><tr><td class="gutter"><pre><span class="line">1</span><br></pre></td><td class="code"><pre><span class="line">chmod u+w /etc/sudoers</span><br></pre></td></tr></table></figure></p><p>这样子就可以获取到权限重新删除英伟达显卡驱动即可。</p><p>重新登录之后就可以正常登录桌面了，但是此时的显卡驱动是使用开源版本的驱动，我们可以安装<code>nvidia-418</code>来切换成英伟达驱动<br><figure class="highlight shell"><table><tr><td class="gutter"><pre><span class="line">1</span><br><span class="line">2</span><br><span class="line">3</span><br></pre></td><td class="code"><pre><span class="line">sudo apt-get install nvidia-418</span><br><span class="line"></span><br><span class="line">reboot</span><br></pre></td></tr></table></figure></p><p>参考：<br><img src="https://raw.githubusercontent.com/itgoyo/PicGoRes/master/img/20191030093726.png" alt=""><br><img src="https://raw.githubusercontent.com/itgoyo/PicGoRes/master/img/20191030093726.png" alt=""></p><hr><div align="center"><br><br>        发现更多更好玩的，欢迎关注我的微信公众号:<span style="color:red;"> FullStacker </span><br><br>        <img src="/img/fullstacker.jpg" height="400px" width="400px"><br>    </div>]]></content>
    
    <summary type="html">


        &lt;link rel=&quot;stylesheet&quot; class=&quot;aplayer-secondary-style-marker&quot; href=&quot;/assets/css/APlayer.min.css&quot;&gt;&lt;script src=&quot;/assets/js/APlayer.min.js&quot; cla
      
    
    </summary>
    
      <category term="Linux" scheme="https://itgoyo.github.io/categories/Linux/"/>
    
    
      <category term="Linux" scheme="https://itgoyo.github.io/tags/Linux/"/>
    
  </entry>
  
  <entry>
    <title>Python列表和元组的详细区别</title>
    <link href="https://itgoyo.github.io/2019/09/27/Python%E5%88%97%E8%A1%A8%E5%92%8C%E5%85%83%E7%BB%84%E7%9A%84%E8%AF%A6%E7%BB%86%E5%8C%BA%E5%88%AB/"/>
    <id>https://itgoyo.github.io/2019/09/27/Python列表和元组的详细区别/</id>
    <published>2019-09-27T01:43:57.000Z</published>
    <updated>2019-09-27T01:47:09.395Z</updated>
    
    <content type="html"><![CDATA[<link rel="stylesheet" class="aplayer-secondary-style-marker" href="/assets/css/APlayer.min.css"><script src="/assets/js/APlayer.min.js" class="aplayer-secondary-script-marker"></script><p>Python 列表和元组的详细区别<br>一、列表和元组的区别<br>列表是动态数组，它们不可变且可以重设长度（改变其内部元素的个数）。<br>元组是静态数组，它们不可变，且其内部数据一旦创建便无法改变。<br>元组缓存于 Python 运行时环境，这意味着我们每次使用元组时无须访问内核去分配内存。<br>这些区别结实率两者在设计哲学上的不同：</p><p>列表可被用于保存多个互相独立对象的数据集合<br>元组用于描述一个不会改不安的事务的多个属性<br>二、列表（List）<br>列表一旦创建了我们就可以根据自己的需要随意改变它的内容：<br><figure class="highlight plain"><table><tr><td class="gutter"><pre><span class="line">1</span><br><span class="line">2</span><br><span class="line">3</span><br><span class="line">4</span><br><span class="line">5</span><br><span class="line">6</span><br></pre></td><td class="code"><pre><span class="line"></span><br><span class="line"></span><br><span class="line">&gt;&gt;&gt; l = [1, 2, 3, 4, 5, 6]</span><br><span class="line">&gt;&gt;&gt; l[0] = l[2] * l[3]</span><br><span class="line">&gt;&gt;&gt; l</span><br><span class="line">[12, 2, 3, 4, 5, 6]</span><br></pre></td></tr></table></figure></p><p>另外我们可以给列边添加新的数据来增加其大小：<br><figure class="highlight plain"><table><tr><td class="gutter"><pre><span class="line">1</span><br><span class="line">2</span><br><span class="line">3</span><br><span class="line">4</span><br><span class="line">5</span><br><span class="line">6</span><br><span class="line">7</span><br></pre></td><td class="code"><pre><span class="line">&gt;&gt;&gt; len(l)</span><br><span class="line">6</span><br><span class="line">&gt;&gt;&gt; l.append(7)</span><br><span class="line">&gt;&gt;&gt; l</span><br><span class="line">[12, 2, 3, 4, 5, 6, 7]</span><br><span class="line">&gt;&gt;&gt; len(l)</span><br><span class="line">7</span><br></pre></td></tr></table></figure></p><p>这是因为动态数组支持 resize 操作，可以增加数组的容量。当一个大小为 N 的列表第一次需要添加数据时，Python 会创建一个新的列表，足够放原来的 N 个元素以及额外添加的元素。不过，实际分配的并不是 N+1 个元素，而是 M 个元素，M &gt; N, 这是为了给未来的添加预留空间。然后旧列表的数据被复制到新列表中，旧列表则会被销毁。从设计理念上来说，第一次添加可能是后续多次添加的开始，通过预留空间的做法，我们就可以减少这一分配空间的操作次数以及内存复制的次数。这点非常重要，因为内存复制可能非常的昂贵，特别是当列表大小开始增长以后。</p><p>三、元组（Tuple）<br>元组是固定且不可改变的。这意味着一旦元组被创建，和列表不同，它的内容无法被修改或它的大小也无法被改变。<br><figure class="highlight plain"><table><tr><td class="gutter"><pre><span class="line">1</span><br><span class="line">2</span><br><span class="line">3</span><br><span class="line">4</span><br><span class="line">5</span><br></pre></td><td class="code"><pre><span class="line">&gt;&gt;&gt; t = (1, 2, 3, 4)</span><br><span class="line">&gt;&gt;&gt; t[0] = 5</span><br><span class="line">Traceback (most recent call last):</span><br><span class="line">  File &quot;&lt;stdin&gt;&quot;, line 1, in &lt;module&gt;</span><br><span class="line">TypeError: &apos;tuple&apos; object does not support item assignment</span><br></pre></td></tr></table></figure></p><p>虽然它们不支持改变大小，但是我们可以将两个元组合并成一个新元组。这一操作类似列表的 resize 操作，但我们不需要为新生的元组分配任何额外的空间：<br><figure class="highlight plain"><table><tr><td class="gutter"><pre><span class="line">1</span><br><span class="line">2</span><br><span class="line">3</span><br><span class="line">4</span><br></pre></td><td class="code"><pre><span class="line">&gt;&gt;&gt; t1 = (1, 2, 3, 4)</span><br><span class="line">&gt;&gt;&gt; t2 = (5, 6, 7, 8)</span><br><span class="line">&gt;&gt;&gt; t1 + t2</span><br><span class="line">(1, 2, 3, 4, 5, 6, 7, 8)</span><br></pre></td></tr></table></figure></p><p>如果我们将其与列表的 append 操作比较，我们会看到它的复杂度是 O (n) 而不是列表的 O (1)。这是因为对元组每添加一个新元素都会有分配和复制操作，而不是像列表那样仅在额外的空间耗尽时发生。所以元组并没有提供一个类似 append 的自增操作，任意两个元组相加始终返回一个新分配的元组。</p><p>该网站为 Python Tutor, 一个能够对 python 运行内存可视化的网站，非常适合初学者研究，在运行过程中内存发生了什么。</p><p>元组的静态特性的另一个好处体现在一些会在 Python 后台发生的事情：资源缓存。</p><p>Python 是一门垃圾收集语言，这意味着当一个变量不再被使用时，Python 会将该变量使用的内存释放回操作系统，以供其他程序（变量）使用。然而，对于长度为 1~20 的元组，即使它们不在被使用，它们的空间也不会立刻还给系统，而是留待未来使用。这意味着当未来需要一个同样大小的新的元组时，我们不再需要向操作系统申请一块内存来存放数据，因为我们已经有了预留的空间。</p><p>这看上去可能是个细微的好处，但是实际上是元组一个很神奇的地方：它们可以被轻松快速地创建，因为它们可以避免跟操作系统频繁的打交道，而后者会花很长的时间。</p><p>下面举个例子会非常直观的说明问题<br><figure class="highlight plain"><table><tr><td class="gutter"><pre><span class="line">1</span><br><span class="line">2</span><br><span class="line">3</span><br><span class="line">4</span><br><span class="line">5</span><br></pre></td><td class="code"><pre><span class="line">In [1]: %timeit l = [0, 1, 2, 3, 4, 5, 6, 7, 8, 9]</span><br><span class="line">93.7 ns ± 3.33 ns per loop (mean ± std. dev. of 7 runs, 10000000 loops each)</span><br><span class="line"></span><br><span class="line">In [2]: %timeit t = (0, 1, 2, 3, 4, 5, 6, 7, 8, 9)</span><br><span class="line">18.5 ns ± 1.19 ns per loop (mean ± std. dev. of 7 runs, 10000000 loops each)</span><br></pre></td></tr></table></figure></p><p>上面的示例中显示了初始化一个列表比初始化一个元组慢了 5.1 倍 —— 如果这是在一个循环中，这点差别会很快的累加起来。</p><hr><div align="center"><br>发现更多更好玩的，欢迎关注我的微信公众号:fullstacker<br><br><img src="/img/qrcode.jpg" alt=""><br></div>]]></content>
    
    <summary type="html">


        &lt;link rel=&quot;stylesheet&quot; class=&quot;aplayer-secondary-style-marker&quot; href=&quot;/assets/css/APlayer.min.css&quot;&gt;&lt;script src=&quot;/assets/js/APlayer.min.js&quot; cla
      
    
    </summary>
    
      <category term="Python" scheme="https://itgoyo.github.io/categories/Python/"/>
    
    
      <category term="Python" scheme="https://itgoyo.github.io/tags/Python/"/>
    
  </entry>
  
  <entry>
    <title>Python基础一</title>
    <link href="https://itgoyo.github.io/2019/09/26/Python%E5%9F%BA%E7%A1%80%E4%B8%80/"/>
    <id>https://itgoyo.github.io/2019/09/26/Python基础一/</id>
    <published>2019-09-26T11:26:16.000Z</published>
    <updated>2019-09-27T01:08:05.667Z</updated>
    
    <content type="html"><![CDATA[<link rel="stylesheet" class="aplayer-secondary-style-marker" href="/assets/css/APlayer.min.css"><script src="/assets/js/APlayer.min.js" class="aplayer-secondary-script-marker"></script><h1 id="一，Python-介绍"><a href="#一，Python-介绍" class="headerlink" title="一，Python 介绍"></a>一，Python 介绍</h1><h4 id="1-python-的出生与应用"><a href="#1-python-的出生与应用" class="headerlink" title="1. python 的出生与应用"></a><strong>1. python 的出生与应用</strong></h4><p>　　python 的创始人为吉多・范罗苏姆（Guido van Rossum）。1989 年的圣诞节期间，吉多・范罗苏姆（中文名字：龟叔）为了在阿姆斯特丹打发时间，决心开发一个新的脚本解释程序，作为 ABC 语言的一种继承。  </p><p>（龟叔：2005 年加入谷歌至 2012 年，2013 年加入 Dropbox 直到现在，依然掌握着 Python 发展的核心方向，被称为仁慈的独裁者）。</p><p><img src="https://images2017.cnblogs.com/blog/988316/201709/988316-20170911121503547-2124074284.png" alt=""></p><p>2017 年 7 月的 TIOBE 排行榜，Python 已经占据第四的位置， Python 崇尚优美、清晰、简单，是一个优秀并广泛使用的语言。</p><p><img src="https://images2017.cnblogs.com/blog/988316/201708/988316-20170831184813937-1153395617.png" alt=""></p><p>由上图可见，Python 整体呈上升趋势，反映出 Python 应用越来越广泛并且也逐渐得到业内的认可！！！</p><p>Python 可以应用于众多领域，如：数据分析、组件集成、网络服务、图像处理、数值计算和科学计算等众多领域。目前业内几乎所有大中型互联网企业都在使用 Python，如：Youtube、Dropbox、BT、Quora（中国知乎）、豆瓣、知乎、Google、Yahoo!、Facebook、NASA、百度、腾讯、汽车之家、美团等。</p><p><strong>目前 Python 主要应用领域：</strong></p><ul><li><strong>云计算</strong>: 云计算最火的语言， 典型应用 OpenStack</li><li><strong>WEB 开发</strong>: 众多优秀的 WEB 框架，众多大型网站均为 Python 开发，Youtube, Dropbox, 豆瓣。。。， 典型 WEB 框架有 Django</li><li><strong>科学运算、人工智能</strong>: 典型库 NumPy, SciPy, Matplotlib, Enthought librarys,pandas</li><li><strong>系统运维</strong>: 运维人员必备语言</li><li><strong>金融</strong>：量化交易，金融分析，在金融工程领域，Python 不但在用，且用的最多，而且重要性逐年提高。原因：作为动态语言的 Python，语言结构清晰简单，库丰富，成熟稳定，科学计算和统计分析都很牛逼，生产效率远远高于 c,c++,java, 尤其擅长策略回测</li><li><strong>图形 GUI</strong>: PyQT, WxPython,TkInter</li></ul><p><strong>Python 在一些公司的应用： </strong></p><ul><li>谷歌：Google App Engine 、code.google.com 、Google earth 、谷歌爬虫、Google 广告等项目都在大量使用 Python 开发</li><li>CIA: 美国中情局网站就是用 Python 开发的</li><li>NASA: 美国航天局 (NASA) 大量使用 Python 进行数据分析和运算</li><li>YouTube: 世界上最大的视频网站 YouTube 就是用 Python 开发的</li><li>Dropbox: 美国最大的在线云存储网站，全部用 Python 实现，每天网站处理 10 亿个文件的上传和下载</li><li>Instagram: 美国最大的图片分享社交网站，每天超过 3 千万张照片被分享，全部用 python 开发</li><li>Facebook: 大量的基础库均通过 Python 实现的</li><li>Redhat: 世界上最流行的 Linux 发行版本中的 yum 包管理工具就是用 python 开发的</li><li>豆瓣：公司几乎所有的业务均是通过 Python 开发的</li><li>知乎：国内最大的问答社区，通过 Python 开发 (国外 Quora)</li><li>春雨医生：国内知名的在线医疗网站是用 Python 开发的</li><li>除上面之外，还有搜狐、金山、腾讯、盛大、网易、百度、阿里、淘宝 、土豆、新浪、果壳等公司都在使用 Python 完成各种各样的任务。 </li></ul><p><strong>python 发展史</strong></p><ul><li>1989 年，为了打发圣诞节假期，Guido 开始写 Python 语言的编译器。Python 这个名字，来自 Guido 所挚爱的电视剧 Monty Python’s Flying Circus。他希望这个新的叫做 Python 的语言，能符合他的理想：创造一种 C 和 shell 之间，功能全面，易学易用，可拓展的语言。</li><li>1991 年，第一个 Python 编译器诞生。它是用 C 语言实现的，并能够调用 C 语言的库文件。从一出生，Python 已经具有了：类，函数，异常处理，包含表和词典在内的核心数据类型，以及模块为基础的拓展系统。</li><li>Granddaddy of Python web frameworks, Zope 1 was released in 1999</li><li>Python 1.0 - January 1994 增加了 <a href="https://en.wikipedia.org/wiki/Lambda_calculus" target="_blank" rel="noopener">lambda</a>, <a href="https://en.wikipedia.org/wiki/Map_%28higher-order_function%29" target="_blank" rel="noopener">map</a>, <a href="https://en.wikipedia.org/wiki/Filter_%28higher-order_function%29" target="_blank" rel="noopener">filter</a> and <a href="https://en.wikipedia.org/wiki/Fold_%28higher-order_function%29" target="_blank" rel="noopener">reduce</a>.</li><li>Python 2.0 - October 16, 2000，加入了内存回收机制，构成了现在 Python 语言框架的基础</li><li>Python 2.4 - November 30, 2004, 同年目前最流行的 WEB 框架 Django 诞生</li><li>Python 2.5 - September 19, 2006</li><li>Python 2.6 - October 1, 2008</li><li>Python 2.7 - July 3, 2010</li><li>In November 2014, it was announced that Python 2.7 would be supported until 2020, and reaffirmed that there would be no 2.8 release as users were expected to move to Python 3.4+ as soon as possible</li><li>Python 3.0 - December 3, 2008</li><li>Python 3.1 - June 27, 2009</li><li>Python 3.2 - February 20, 2011</li><li>Python 3.3 - September 29, 2012</li><li>Python 3.4 - March 16, 2014</li><li>Python 3.5 - September 13, 2015</li><li>Python 3.6 - December 16,2016</li></ul><h4 id="2-python-是什么编程语言。"><a href="#2-python-是什么编程语言。" class="headerlink" title="2. python 是什么编程语言。"></a><strong>2. python 是什么编程语言。</strong></h4><p><em>编程语言主要从以下几个角度为进行分类，编译型和解释型、静态语言和动态语言、强类型定义语言和弱类型定义语言，每个分类代表什么意思呢，我们一起来看一下。</em></p><p><strong>2.1 编译型与解释型。</strong></p><p><strong>编译器</strong>是把源程序的每一条语句都编译成机器语言，并保存成二进制文件，这样运行时计算机可以直接以机器语言来运行此程序，速度很快； </p><p>而<strong>解释器</strong>则是只在执行程序时，才一条一条的解释成机器语言给计算机来执行，所以运行速度是不如编译后的程序运行的快的. </p><p>这是因为计算机不能直接认识并执行我们写的语句，它只能认识机器语言 (是二进制的形式)</p><p><img src="https://images2017.cnblogs.com/blog/988316/201709/988316-20170911120842485-871465200.png" alt=""></p><p><img src="https://images2017.cnblogs.com/blog/988316/201709/988316-20170911120939860-618931676.png" alt=""></p><p><strong>编译型</strong><br>优点：编译器一般会有预编译的过程对代码进行优化。因为编译只做一次，运行时不需要编译，所以编译型语言的程序执行效率高。可以脱离语言环境独立运行。<br>缺点：编译之后如果需要修改就需要整个模块重新编译。编译的时候根据对应的运行环境生成机器码，不同的操作系统之间移植就会有问题，需要根据运行的操作系统环境编译不同的可执行文件。</p><p><strong>解释型</strong><br>优点：有良好的平台兼容性，在任何环境中都可以运行，前提是安装了解释器（虚拟机）。灵活，修改代码的时候直接修改就可以，可以快速部署，不用停机维护。</p><p>缺点：每次运行的时候都要解释一遍，性能上不如编译型语言。</p><p><strong>2.2 动态语言和静态语言</strong><br>通常我们所说的动态语言、静态语言是指动态类型语言和静态类型语言。</p><p>（1）动态类型语言：动态类型语言是指在运行期间才去做数据类型检查的语言，也就是说，在用动态类型的语言编程时，永远也不用给任何变量指定数据类型，该语言会在你第一次赋值给变量时，在内部将数据类型记录下来。Python 和 Ruby 就是一种典型的动态类型语言，其他的各种脚本语言如 VBScript 也多少属于动态类型语言。</p><p>（2）静态类型语言：静态类型语言与动态类型语言刚好相反，它的数据类型是在编译其间检查的，也就是说在写程序时要声明所有变量的数据类型，C/C++ 是静态类型语言的典型代表，其他的静态类型语言还有 C#、JAVA 等。</p><p><strong>2.3 强类型定义语言和弱类型定义语言</strong></p><p>（1）强类型定义语言：强制数据类型定义的语言。也就是说，一旦一个变量被指定了某个数据类型，如果不经过强制转换，那么它就永远是这个数据类型了。举个例子：如果你定义了一个整型变量 a, 那么程序根本不可能将 a 当作字符串类型处理。强类型定义语言是类型安全的语言。</p><p>（2）弱类型定义语言：数据类型可以被忽略的语言。它与强类型定义语言相反，一个变量可以赋不同数据类型的值。</p><p>强类型定义语言在速度上可能略逊色于弱类型定义语言，但是强类型定义语言带来的严谨性能够有效的避免许多错误。另外，“这门语言是不是动态语言” 与 “这门语言是否类型安全” 之间是完全没有联系的！<br>例如：Python 是动态语言，是强类型定义语言（类型安全的语言）; VBScript 是动态语言，是弱类型定义语言（类型不安全的语言）; JAVA 是静态语言，是强类型定义语言（类型安全的语言）。</p><p>通过上面这些介绍，我们可以得出，<strong>python 是一门动态解释性的强类型定义语言。</strong></p><h4 id="3-python-的优缺点。"><a href="#3-python-的优缺点。" class="headerlink" title="3. python 的优缺点。"></a><strong>3. python 的优缺点。</strong></h4><p>先看优点</p><ol><li>Python 的定位是 “优雅”、“明确”、“简单”，所以 Python 程序看上去总是简单易懂，初学者学 Python，不但入门容易，而且将来深入下去，可以编写那些非常非常复杂的程序。</li><li>开发效率非常高，Python 有非常强大的第三方库，基本上你想通过计算机实现任何功能，Python 官方库里都有相应的模块进行支持，直接下载调用后，在基础库的基础上再进行开发，大大降低开发周期，避免重复造轮子。</li><li>高级语言 ———— 当你用 Python 语言编写程序的时候，你无需考虑诸如如何管理你的程序使用的内存一类的底层细节</li><li>可移植性 ———— 由于它的开源本质，Python 已经被移植在许多平台上（经过改动使它能够工 作在不同平台上）。如果你小心地避免使用依赖于系统的特性，那么你的所有 Python 程序无需修改就几乎可以在市场上所有的系统平台上运行</li><li>可扩展性 ———— 如果你需要你的一段关键代码运行得更快或者希望某些算法不公开，你可以把你的部分程序用 C 或 C++ 编写，然后在你的 Python 程序中使用它们。</li><li>可嵌入性 ———— 你可以把 Python 嵌入你的 C/C++ 程序，从而向你的程序用户提供脚本功能。</li></ol><p>再看缺点：</p><ol><li>速度慢，Python 的运行速度相比 C 语言确实慢很多，跟 JAVA 相比也要慢一些，因此这也是很多所谓的大牛不屑于使用 Python 的主要原因，但其实这里所指的运行速度慢在大多数情况下用户是无法直接感知到的，必须借助测试工具才能体现出来，比如你用 C 运一个程序花了 0.01s, 用 Python 是 0.1s, 这样 C 语言直接比 Python 快了 10 倍，算是非常夸张了，但是你是无法直接通过肉眼感知的，因为一个正常人所能感知的时间最小单位是 0.15-0.4s 左右，哈哈。其实在大多数情况下 Python 已经完全可以满足你对程序速度的要求，除非你要写对速度要求极高的搜索引擎等，这种情况下，当然还是建议你用 C 去实现的。</li><li>代码不能加密，因为 PYTHON 是解释性语言，它的源码都是以名文形式存放的，不过我不认为这算是一个缺点，如果你的项目要求源代码必须是加密的，那你一开始就不应该用 Python 来去实现。</li><li>线程不能利用多 CPU 问题，这是 Python 被人诟病最多的一个缺点，GIL 即全局解释器锁（Global Interpreter Lock），是<a href="http://zh.wikipedia.org/wiki/%E8%AE%A1%E7%AE%97%E6%9C%BA%E7%A8%8B%E5%BA%8F%E8%AE%BE%E8%AE%A1%E8%AF%AD%E8%A8%80" title="计算机程序设计语言" target="_blank" rel="noopener">计算机程序设计语言</a><a href="http://zh.wikipedia.org/wiki/%E8%A7%A3%E9%87%8A%E5%99%A8" title="解释器" target="_blank" rel="noopener">解释器</a>用于<a href="http://zh.wikipedia.org/wiki/%E5%90%8C%E6%AD%A5" title="同步" target="_blank" rel="noopener">同步</a><a href="http://zh.wikipedia.org/wiki/%E7%BA%BF%E7%A8%8B" title="线程" target="_blank" rel="noopener">线程</a>的工具，使得任何时刻仅有一个线程在执行，Python 的线程是操作系统的原生线程。在 Linux 上为 pthread，在 Windows 上为 Win thread，完全由操作系统调度线程的执行。一个 python 解释器进程内有一条主线程，以及多条用户程序的执行线程。即使在多核 CPU 平台上，由于 GIL 的存在，所以禁止多线程的并行执行。关于这个问题的折衷解决方法，我们在以后线程和进程章节里再进行详细探讨。</li></ol><p>当我们编写 Python 代码时，我们得到的是一个包含 Python 代码的以<code>.py</code> 为扩展名的文本文件。要运行代码，就需要 Python 解释器去执行<code>.py</code> 文件。</p><p>由于整个 Python 语言从规范到解释器都是开源的，所以理论上，只要水平够高，任何人都可以编写 Python 解释器来执行 Python 代码（当然难度很大）。事实上，确实存在多种 Python 解释器。</p><h4 id="4-python-的种类。"><a href="#4-python-的种类。" class="headerlink" title="4. python 的种类。"></a>4. python 的种类。</h4><p><strong>CPython</strong></p><p>当我们从 <a href="https://www.python.org/" target="_blank" rel="noopener">Python 官方网站</a>下载并安装好 Python 3.6 后，我们就直接获得了一个官方版本的解释器：CPython。这个解释器是用 C 语言开发的，所以叫 CPython。在命令行下运行 <code>python</code> 就是启动 CPython 解释器。</p><p>CPython 是使用最广的 Python 解释器。教程的所有代码也都在 CPython 下执行。</p><p><strong>IPython</strong></p><p>IPython 是基于 CPython 之上的一个交互式解释器，也就是说，IPython 只是在交互方式上有所增强，但是执行 Python 代码的功能和 CPython 是完全一样的。好比很多国产浏览器虽然外观不同，但内核其实都是调用了 IE。</p><p>CPython 用 <code>&gt;&gt;&gt;</code> 作为提示符，而 IPython 用 <code>In [`</code>序号<code></code>]:` 作为提示符。</p><p><strong>PyPy</strong></p><p>PyPy 是另一个 Python 解释器，它的目标是执行速度。PyPy 采用 <a href="http://en.wikipedia.org/wiki/Just-in-time_compilation" target="_blank" rel="noopener">JIT 技术</a>，对 Python 代码进行动态编译（注意不是解释），所以可以显著提高 Python 代码的执行速度。</p><p>绝大部分 Python 代码都可以在 PyPy 下运行，但是 PyPy 和 CPython 有一些是不同的，这就导致相同的 Python 代码在两种解释器下执行可能会有不同的结果。如果你的代码要放到 PyPy 下执行，就需要了解 <a href="http://pypy.readthedocs.org/en/latest/cpython_differences.html" target="_blank" rel="noopener">PyPy 和 CPython 的不同点</a>。</p><p><strong>Jython</strong></p><p>Jython 是运行在 Java 平台上的 Python 解释器，可以直接把 Python 代码编译成 Java 字节码执行。</p><p><strong>IronPython</strong></p><p>IronPython 和 Jython 类似，只不过 IronPython 是运行在微软.Net 平台上的 Python 解释器，可以直接把 Python 代码编译成.Net 的字节码。</p><p><strong>小结：</strong></p><p>　　Python 的解释器很多，但使用最广泛的还是 CPython。如果要和 Java 或.Net 平台交互，最好的办法不是用 Jython 或 IronPython，而是通过网络调用来交互，确保各程序之间的独立性。</p><h1 id="二-python-环境"><a href="#二-python-环境" class="headerlink" title="二. python 环境"></a>二. python 环境</h1><p>windows 下安装 Python（手动添加环境变量）以 2.7 版本举例：</p><p><strong>windows：</strong></p><p><code>1`</code>、下载安装包`</p><p><code>https:`</code>/<code>/</code><a href="http://www.python.org``/``downloads``/`" target="_blank" rel="noopener">www.python.org``/``downloads``/`</a></p><p><code>2`</code>、安装`</p><p><code>默认安装路径：C:\python27</code></p><p><code>3`</code>、配置环境变量`</p><p><code>【右键计算机】`</code>-<code>-</code>》【属性】<code>-</code>-<code>》【高级系统设置】</code>-<code>-</code>》【高级】<code>-</code>-<code>》【环境变量】</code>-<code>-</code>》【在第二个内容框中找到 变量名为Path 的一行，双击】 <code>-</code>-<code></code>&gt; 【Python安装目录追加到变值值中，用 ； 分割】`</p><p><code>如：原来的值;C:\python27，切记前面有分号</code></p><p>windows 下安装 Python（自动添加环境变量）以 3,.5 版本的举例：</p><p>1. 官网下载：<a href="https://www.python.org/downloads/windows/" target="_blank" rel="noopener">https://www.python.org/downloads/windows/</a> </p><p>2. 选择版本。</p><p><img src="https://images2017.cnblogs.com/blog/988316/201709/988316-20170915172514469-312217099.png" alt=""></p><p>3. 自动添加环境变量。</p><p><img src="https://images2017.cnblogs.com/blog/988316/201709/988316-20170915172904078-2110770811.png" alt=""></p><p>4. 更改完成。</p><p><img src="https://images2017.cnblogs.com/blog/988316/201709/988316-20170915173126860-82071647.png" alt=""></p><p>5. 点击安装即可。</p><p><strong>linux：</strong></p><p><code>无需安装，原装Python环境</code></p><p><code>ps：如果自带`</code>2.6<code>，请更新至</code>2.7`</p><h1 id="三-python-基础初识。"><a href="#三-python-基础初识。" class="headerlink" title="三. python 基础初识。"></a>三. python 基础初识。</h1><h4 id="1-运行-python-代码。"><a href="#1-运行-python-代码。" class="headerlink" title="1. 运行 python 代码。"></a>1. 运行 python 代码。</h4><p>在 d 盘下创建一个 t1.py 文件内容是：</p><p>print(‘hello world’)</p><p>打开 windows 命令行输入 cmd，确定后 写入代码 python d:t1.py </p><p><img src="https://images2017.cnblogs.com/blog/988316/201709/988316-20170917111005797-4582581.png" alt=""><img src="https://images2017.cnblogs.com/blog/988316/201709/988316-20170917111305953-1783077606.png" alt=""></p><p>您已经运行了第一个 python 程序， 即：终端 —-&gt;cmd—–&gt; python  文件路径。 回车搞定～</p><h4 id="2-解释器。"><a href="#2-解释器。" class="headerlink" title="2. 解释器。"></a>2. 解释器。</h4><p>上一步中执行 python d:t1.py 时，明确的指出 t1.py 脚本由 python 解释器来执行。</p><p>如果想要类似于执行 shell 脚本一样执行 python 脚本，例： <code>./t1.py</code>，那么就需要在 hello.py 文件的头部指定解释器，如下：</p><p><code>#!/usr/bin/env python</code></p><p><code>print</code> <code>&quot;hello,world&quot;</code></p><p>如此一来，执行： .<code>/t1.py</code> 即可。</p><p>ps：执行前需给予 t1.py 执行权限，chmod 755 t1.py</p><h4 id="3-注释。"><a href="#3-注释。" class="headerlink" title="3. 注释。"></a>3. 注释。</h4><p>当行注释：# 被注释内容</p><p>多行注释：’’’ 被注释内容 ‘’’，或者 “””被注释内容”””</p><h4 id="4-变量"><a href="#4-变量" class="headerlink" title="4. 变量"></a>4. 变量</h4><p>变量是什么？  变量：把程序运行的中间结果临时的存在内存里，以便后续的代码调用。</p><p>4.1、声明变量</p><p>lux = ‘鲁迅本人’</p><p>上述代码声明了一个变量，变量名为： lux，变量 name 的值为：”鲁迅本人”</p><p>变量的作用：昵称，其代指内存里某个地址中保存的内容</p><p><img src="https://img2018.cnblogs.com/blog/988316/201903/988316-20190320161204923-1333237354.png" alt=""></p><p>4.2、变量定义的规则：</p><ul><li>变量名只能是 字母、数字或下划线的任意组合</li><li>变量名的第一个字符不能是数字</li><li>以下关键字不能声明为变量名<br>[‘and’, ‘as’, ‘assert’, ‘break’, ‘class’, ‘continue’, ‘def’, ‘del’, ‘elif’, ‘else’, ‘except’, ‘exec’, ‘finally’, ‘for’, ‘from’, ‘global’, ‘if’, ‘import’, ‘in’, ‘is’, ‘lambda’, ‘not’, ‘or’, ‘pass’, ‘print’, ‘raise’, ‘return’, ‘try’, ‘while’, ‘with’, ‘yield’]</li><li>变量的定义要具有可描述性。</li></ul><p>4.3、推荐定义方式</p><p>#驼峰体<br> AgeOfOldboy = 56 NumberOfStudents = 80</p><p>#下划线<br> age_of_oldboy = 56 number_of_students = 80</p><blockquote><p>你觉得哪种更清晰，哪种就是官方推荐的，我想你肯定会先第 2 种，第一种 AgeOfOldboy 咋一看以为是 AngelaBaby</p></blockquote><p>4.4、变量的赋值<br><figure class="highlight plain"><table><tr><td class="gutter"><pre><span class="line">1</span><br><span class="line">2</span><br></pre></td><td class="code"><pre><span class="line">lux = &apos;鲁迅本人&apos;、</span><br><span class="line">name = &apos;太白金星&apos;</span><br></pre></td></tr></table></figure></p><p><img src="https://img2018.cnblogs.com/blog/988316/201903/988316-20190320161740585-1210403150.png" alt=""></p><p>name1 = ‘太白金星’ name2 = name1<br>name3 = name2</p><p><img src="https://img2018.cnblogs.com/blog/988316/201903/988316-20190320162125444-1315440542.png" alt=""></p><p>4.5、定义变量不好的方式举例</p><ul><li>变量名为中文、拼音</li><li>变量名过长</li><li>变量名词不达意</li></ul><h4 id="5-常量"><a href="#5-常量" class="headerlink" title="5. 常量"></a>5. 常量</h4><p>常量即指不变的量，如 pai 3.141592653…, 或在程序运行过程中不会改变的量</p><p>举例，假如老男孩老师的年龄会变，那这就是个变量，但在一些情况下，他的年龄不会变了，那就是常量。在 Python 中没有一个专门的语法代表常量，程序员约定俗成用变量名全部大写代表常量</p><figure class="highlight plain"><table><tr><td class="gutter"><pre><span class="line">1</span><br></pre></td><td class="code"><pre><span class="line">AGE_OF_OLDBOY = 56</span><br></pre></td></tr></table></figure><blockquote><p>在 c 语言中有专门的常量定义语法，<code>const int count = 60;</code> 一旦定义为常量，更改即会报错</p></blockquote><h4 id="6-基础数据类型（初始）。"><a href="#6-基础数据类型（初始）。" class="headerlink" title="6. 基础数据类型（初始）。"></a>6. 基础数据类型（初始）。</h4><p>什么是数据类型？</p><p>　　我们人类可以很容易的分清数字与字符的区别，但是计算机并不能呀，计算机虽然很强大，但从某种角度上看又很傻，除非你明确的告诉它，1 是数字，“汉” 是文字，否则它是分不清 1 和‘汉’的区别的，因此，在每个编程语言里都会有一个叫数据类型的东东，其实就是对常用的各种数据类型进行了明确的划分，你想让计算机进行数值运算，你就传数字给它，你想让他处理文字，就传字符串类型给他。Python 中常用的数据类型有多种，今天我们暂只讲 3 种， 数字、字符串、布尔类型</p><p>6.1、整数类型（int）。</p><p>int（整型）</p><p>在 32 位机器上，整数的位数为 32 位，取值范围为 - 2<strong>31～2</strong>31-1，即 - 2147483648～2147483647</p><p>在 64 位系统上，整数的位数为 64 位，取值范围为 - 2<strong>63～2</strong>63-1，即 - 9223372036854775808～9223372036854775807</p><blockquote><p>除了 int 之外， 其实还有 float 浮点型，复数型，但今天先不讲啦</p></blockquote><p>6.2、字符串类型（str）。</p><p>在 Python 中，加了引号的字符都被认为是字符串！</p><blockquote><blockquote><blockquote><p>name = “Alex Li” #双引号<br>age = “22”       #只要加引号就是字符串<br>age2 = 22          #int</p><p>msg = ‘’’My name is taibai, I am 22 years old!’’’  #我擦，3个引号也可以</p><p>hometown = ‘ShanDong’   #单引号也可以</p></blockquote></blockquote></blockquote><p>那单引号、双引号、多引号有什么区别呢？ 让我大声告诉你，单双引号木有任何区别，只有下面这种情况 你需要考虑单双的配合</p><figure class="highlight plain"><table><tr><td class="gutter"><pre><span class="line">1</span><br></pre></td><td class="code"><pre><span class="line">msg = &quot;My name is Alex , I&apos;m 22 years old!&quot;</span><br></pre></td></tr></table></figure><p>多引号什么作用呢？作用就是多行字符串必须用多引号</p><p>msg = ‘’’<br>今天我想写首小诗，<br>歌颂我的同桌，<br>你看他那乌黑的短发，<br>好像一只炸毛鸡。<br>‘’’<br>print(msg)</p><p>字符串拼接</p><p>数字可以进行加减乘除等运算，字符串呢？让我大声告诉你，也能？what ? 是的，但只能进行 “相加” 和 “相乘” 运算。</p><blockquote><blockquote><blockquote><p>name<br>‘Alex Li’<br>age<br>‘22’</p><p>name + age  #相加其实就是简单拼接<br>‘Alex Li22’</p><p>name * 10 #相乘其实就是复制自己多少次，再拼接在一起<br>‘Alex LiAlex LiAlex LiAlex LiAlex LiAlex LiAlex LiAlex LiAlex LiAlex Li’</p></blockquote></blockquote></blockquote><p>注意，字符串的拼接只能是双方都是字符串，不能跟数字或其它类型拼接</p><blockquote><blockquote><blockquote><p>type(name),type(age2)<br>(<type 'str'="">, <type 'int'="">)</type></type></p><p>name<br>‘Alex Li’<br>age2<br>22<br>name + age2<br>Traceback (most recent call last):<br>  File “<stdin>“, line 1, in <module> TypeError: cannot concatenate ‘str’ and ‘int’ objects #错误提示数字 和 字符 不能拼接</module></stdin></p></blockquote></blockquote></blockquote><p>6.3、布尔值（True，False）。</p><p>布尔类型很简单，就两个值 ，一个 True (真)，一个 False (假), 主要用记逻辑判断</p><p>但其实你们并不明白对么？ let me explain, 我现在有 2 个值 ， a=3, b=5 , 我说 a&gt;b 你说成立么？我们当然知道不成立，但问题是计算机怎么去描述这成不成立呢？或者说 a&lt; b 是成立，计算机怎么描述这是成立呢？</p><p>没错，答案就是，用布尔类型</p><blockquote><blockquote><blockquote><p>a=3<br>b=5</p><p>a &gt; b #不成立就是False,即假<br>False</p><p>a &lt; b #成立就是True, 即真<br>True</p></blockquote></blockquote></blockquote><h4 id="7-程序交互"><a href="#7-程序交互" class="headerlink" title="7. 程序交互"></a>7. 程序交互</h4><p>#!/usr/bin/env python # -<em>- coding: utf-8 -</em>-</p><h1 id="将用户输入的内容赋值给-name-变量"><a href="#将用户输入的内容赋值给-name-变量" class="headerlink" title="将用户输入的内容赋值给 name 变量"></a>将用户输入的内容赋值给 name 变量</h1><p>name = input(“请输入用户名：”) # 打印输入的内容<br>print(name)</p><p>执行脚本就会发现，程序会等待你输入姓名后再往下继续走。</p><p>可以让用户输入多个信息，如下</p><figure class="highlight plain"><table><tr><td class="gutter"><pre><span class="line">1</span><br><span class="line">2</span><br><span class="line">3</span><br><span class="line">4</span><br><span class="line">5</span><br><span class="line">6</span><br></pre></td><td class="code"><pre><span class="line">#!/usr/bin/env python</span><br><span class="line"># -*- coding: utf-8 -*-</span><br><span class="line"></span><br><span class="line">name = input(&quot;What is your name?&quot;)</span><br><span class="line">age = input(&quot;How old are you?&quot;)</span><br><span class="line">hometown = input(&quot;Where is your hometown?&quot;) print(&quot;Hello &quot;,name , &quot;your are &quot;, age , &quot;years old, you came from&quot;,hometown)</span><br></pre></td></tr></table></figure><h4 id="8-流程控制之-–if。"><a href="#8-流程控制之-–if。" class="headerlink" title="8. 流程控制之 –if。"></a>8. 流程控制之 –if。</h4><p>　　假如把写程序比做走路，那我们到现在为止，一直走的都是直路，还没遇到过分叉口，想象现实中，你遇到了分叉口，然后你决定往哪拐必然是有所动机的。你要判断那条岔路是你真正要走的路，如果我们想让程序也能处理这样的判断怎么办？ 很简单，只需要在程序里预设一些条件判断语句，满足哪个条件，就走哪条岔路。这个过程就叫流程控制。</p><p>if…else 语句</p><p>单分支</p><p>if 条件:<br>    满足条件后要执行的代码</p><p>双分支</p><p>“”” if 条件:<br>    满足条件执行代码<br>else:<br>    if条件不满足就走这段 “”” AgeOfOldboy = 48</p><p>if AgeOfOldboy &gt; 50 : print(“Too old, time to retire..”) else: print(“还能折腾几年!”)</p><p>缩进</p><blockquote><p>这里必须要插入这个缩进的知识点</p></blockquote><p>你会发现，上面的 if 代码里，每个条件的下一行都缩进了 4 个空格，这是为什么呢？这就是 Python 的一大特色，强制缩进，目的是为了让程序知道，每段代码依赖哪个条件，如果不通过缩进来区分，程序怎么会知道，当你的条件成立后，去执行哪些代码呢？</p><p>在其它的语言里，大多通过 <code>{}</code> 来确定代码块，比如 C,C++,Java,Javascript 都是这样，看一个 JavaScript 代码的例子</p><p>var age = 56<br>if ( age &lt; 50){<br>  console.log(“还能折腾”)<br>    console.log(‘可以执行多行代码’)<br>}else{<br>   console.log(‘太老了’)<br>}</p><p>在有 <code>{}</code> 来区分代码块的情况下，缩进的作用就只剩下让代码变的整洁了。</p><p>Python 是门超级简洁的语言，发明者定是觉得用 <code>{}</code> 太丑了，所以索性直接不用它，那怎么能区分代码块呢？答案就是强制缩进。</p><p>Python 的缩进有以下几个原则:</p><ul><li>顶级代码必须顶行写，即如果一行代码本身不依赖于任何条件，那它必须不能进行任何缩进</li><li>同一级别的代码，缩进必须一致</li><li>官方建议缩进用 4 个空格，当然你也可以用 2 个，如果你想被人笑话的话。</li></ul><p>多分支</p><p>回到流程控制上来，if…else … 可以有多个分支条件</p><p>if 条件:<br>    满足条件执行代码 elif 条件:<br>    上面的条件不满足就走这个 elif 条件:<br>    上面的条件不满足就走这个 elif 条件:<br>    上面的条件不满足就走这个 else:<br>    上面所有的条件不满足就走这段</p><p>写个猜年龄的游戏吧</p><p>age_of_oldboy = 48 guess = int(input(“&gt;&gt;:”)) if guess &gt; age_of_oldboy : print(“猜的太大了，往小里试试…”) elif guess &lt; age_of_oldboy : print(“猜的太小了，往大里试试…”) else: print(“恭喜你，猜对了…”)</p><p>上面的例子，根据你输入的值不同，会最多得到 3 种不同的结果</p><p>再来个匹配成绩的小程序吧，成绩有 ABCDE5 个等级，与分数的对应关系如下</p><figure class="highlight plain"><table><tr><td class="gutter"><pre><span class="line">1</span><br><span class="line">2</span><br><span class="line">3</span><br><span class="line">4</span><br><span class="line">5</span><br></pre></td><td class="code"><pre><span class="line">A    90-100</span><br><span class="line">B    80-89</span><br><span class="line">C    60-79</span><br><span class="line">D    40-59</span><br><span class="line">E    0-39</span><br></pre></td></tr></table></figure><p>要求用户输入 0-100 的数字后，你能正确打印他的对应成绩</p><p>score = int(input(“输入分数:”)) if score &gt; 100: print(“我擦，最高分才100…”) elif score &gt;= 90: print(“A”) elif score &gt;= 80: print(“B”) elif score &gt;= 60: print(“C”) elif score &gt;= 40: print(“D”) else: print(“太笨了…E”)</p><p>这里有个问题，就是当我输入 95 的时候 ，它打印的结果是 A, 但是 95 明明也大于第二个条件 <code>elif score &gt;=80:</code> 呀，为什么不打印 B 呢？这是因为代码是从上到下依次判断，只要满足一个，就不会再往下走啦，这一点一定要清楚呀！</p><hr><div align="center"><br>发现更多更好玩的，欢迎关注我的微信公众号:fullstacker<br><br><img src="/img/qrcode.jpg" alt=""><br></div>]]></content>
    
    <summary type="html">


        &lt;link rel=&quot;stylesheet&quot; class=&quot;aplayer-secondary-style-marker&quot; href=&quot;/assets/css/APlayer.min.css&quot;&gt;&lt;script src=&quot;/assets/js/APlayer.min.js&quot; cla
      
    
    </summary>
    
      <category term="Python" scheme="https://itgoyo.github.io/categories/Python/"/>
    
    
      <category term="Python" scheme="https://itgoyo.github.io/tags/Python/"/>
    
  </entry>
  
  <entry>
    <title>我个人Mac常用的软件推荐</title>
    <link href="https://itgoyo.github.io/2019/09/25/%E6%88%91%E4%B8%AA%E4%BA%BAMac%E5%B8%B8%E7%94%A8%E7%9A%84%E8%BD%AF%E4%BB%B6%E6%8E%A8%E8%8D%90/"/>
    <id>https://itgoyo.github.io/2019/09/25/我个人Mac常用的软件推荐/</id>
    <published>2019-09-25T09:58:49.000Z</published>
    <updated>2020-01-02T05:51:32.456Z</updated>
    
    <content type="html"><![CDATA[<link rel="stylesheet" class="aplayer-secondary-style-marker" href="/assets/css/APlayer.min.css"><script src="/assets/js/APlayer.min.js" class="aplayer-secondary-script-marker"></script><h3 id="Alfred"><a href="#Alfred" class="headerlink" title="Alfred"></a>Alfred</h3><p>效率软件，让能更快的启动各种软件</p><h3 id="VScode"><a href="#VScode" class="headerlink" title="VScode"></a>VScode</h3><p>编辑器，市面上最热的编辑器，好用的不只是一点点，加上Vim插件简直就是秒杀市面上各种IDE</p><h3 id="PicGo"><a href="#PicGo" class="headerlink" title="PicGo"></a>PicGo</h3><p>一个开源图床软件，支持各大网站的图床设置</p><h3 id="Evernote"><a href="#Evernote" class="headerlink" title="Evernote"></a>Evernote</h3><p>印象笔记，不论是做剪藏还是做个人的TODO，好用的一逼，而且免费每个月也有很多容量</p><h3 id="Karabiner"><a href="#Karabiner" class="headerlink" title="Karabiner"></a>Karabiner</h3><p>键位修改神器，用过的都说好，配合现在使用的HHKB设置自己最喜欢的键位，简直像飞起来一样</p><h3 id="Lantern"><a href="#Lantern" class="headerlink" title="Lantern"></a>Lantern</h3><p>科学上网工具</p><h3 id="Moom"><a href="#Moom" class="headerlink" title="Moom"></a>Moom</h3><p>窗口处理软件，可以快速的整理每一个页面的窗口尺寸</p><h3 id="Iterm2"><a href="#Iterm2" class="headerlink" title="Iterm2"></a>Iterm2</h3><p>Mac下面最好用的终端软件</p><h3 id="Vim"><a href="#Vim" class="headerlink" title="Vim"></a>Vim</h3><p>关于Vim这个软件，只有用过的人才知道Vim的好，现在我不论使用那种IDE都必须安装Vim的插件</p><h3 id="Yu-Writer"><a href="#Yu-Writer" class="headerlink" title="Yu Writer"></a>Yu Writer</h3><p>Markdown文档编辑神器，可以实现快速复制粘贴，是我个人觉得最好用的md软件</p><h3 id="ScreenFlow"><a href="#ScreenFlow" class="headerlink" title="ScreenFlow"></a>ScreenFlow</h3><p>Mac下面最好用的录屏软件，支持切换麦克风输入口，支持虚拟声道</p><h3 id="iStat-Menus"><a href="#iStat-Menus" class="headerlink" title="iStat Menus"></a>iStat Menus</h3><p>监听电脑各种状态</p><h3 id="CleanMyMac"><a href="#CleanMyMac" class="headerlink" title="CleanMyMac"></a>CleanMyMac</h3><p>清理各种辣鸡缓存，还有用来卸载软件，基本都是人手一个的软件</p><h3 id="Chrome世界上最好用的浏览器，不支持反驳"><a href="#Chrome世界上最好用的浏览器，不支持反驳" class="headerlink" title="Chrome世界上最好用的浏览器，不支持反驳"></a>Chrome世界上最好用的浏览器，不支持反驳</h3><hr><div align="center"><br><br>        发现更多更好玩的，欢迎关注我的微信公众号:<span style="color:red;"> FullStacker </span><br><br>        <img src="/img/fullstacker.jpg" height="400px" width="400px"><br>    </div>]]></content>
    
    <summary type="html">


        &lt;link rel=&quot;stylesheet&quot; class=&quot;aplayer-secondary-style-marker&quot; href=&quot;/assets/css/APlayer.min.css&quot;&gt;&lt;script src=&quot;/assets/js/APlayer.min.js&quot; cla
      
    
    </summary>
    
      <category term="生活随笔" scheme="https://itgoyo.github.io/categories/%E7%94%9F%E6%B4%BB%E9%9A%8F%E7%AC%94/"/>
    
    
      <category term="生活随笔" scheme="https://itgoyo.github.io/tags/%E7%94%9F%E6%B4%BB%E9%9A%8F%E7%AC%94/"/>
    
  </entry>
  
  <entry>
    <title>html转png遇到的问题</title>
    <link href="https://itgoyo.github.io/2019/09/02/html%E8%BD%ACpng%E9%81%87%E5%88%B0%E7%9A%84%E9%97%AE%E9%A2%98/"/>
    <id>https://itgoyo.github.io/2019/09/02/html转png遇到的问题/</id>
    <published>2019-09-02T03:13:34.000Z</published>
    <updated>2020-01-02T05:55:15.464Z</updated>
    
    <content type="html"><![CDATA[<link rel="stylesheet" class="aplayer-secondary-style-marker" href="/assets/css/APlayer.min.css"><script src="/assets/js/APlayer.min.js" class="aplayer-secondary-script-marker"></script><p>&nbsp;&nbsp;今天想分享一篇文章到朋友圈，发现使用印象笔记分享的效果不是很好，需要进入群组，然后有的朋友可能是没有印象笔记的账号的，所以使用印象笔记分享具有很大胆局限性。然后就是用 YuWriter 弄好 md 文档然后导出 图片，然后发现导出图片只能发现导出当前页的一张图片，并且不是长图，文章内容显示不全，所以就导出 html，然后在线转成 png。<br>&nbsp;&nbsp;然后 google 了一下发现一个网站 <a href="https://pdfcrowd.com/#convert_by_upload" target="_blank" rel="noopener">https://pdfcrowd.com/#convert_by_upload</a> ，导出是正常的，但是图片里面有很多水印显示很难看，所以就放弃了这个网站，于是就想到了之前的一个网站 <a href="https://convertio.co" target="_blank" rel="noopener">https://convertio.co</a> ，里面确实也有 html 转 png 的，但是我尝试了一下，发现转 png 之后，里面的内容是乱码的，然后本地发现本地打开 html 是正常的，但是放到 apache 服务器里就显示乱码，即便是使用 vscode 修改了 html 的文本编码也是没有解决问题，然后手动在 html head 加上<code>&lt;head&gt;&lt;meta charset=&quot;utf-8&quot;&gt;&lt;/head&gt;</code>，这样子再 apache 上面访问也是正常的，然后再次提交到 <a href="https://convertio.co" target="_blank" rel="noopener">https://convertio.co</a> ，发现还是出现乱码，于是上 Github 找到 YuWriter项目的 issues 里面查看导出 html 乱码的的问题，发现也有人出现相同的问题 <a href="https://github.com/ivarptr/yu-writer.site/issues/510" target="_blank" rel="noopener">https://github.com/ivarptr/yu-writer.site/issues/510</a> ，然后作者里面说可能是导出 html 的时候是用的 wordpress，然后发现确实是用的这个，后面改成了<code>Standard</code>,这样子本地导出就不会出现乱码了，但是在网上转格式的时候发现图片乱码没有了，但是内容丢失了很多，最终还是没有解决问题。<br>&nbsp;&nbsp;然后灵机一动，想到<code>Surfingkeys</code>里面有截长图的功能，但是必须在访问域名的基础上才有作用，打开本地的 html 是没有作用的，然后就在 apache 服务器面，打开网页然后使用快捷键<code>yG</code>截长图。</p><hr><div align="center"><br><br>        发现更多更好玩的，欢迎关注我的微信公众号:<span style="color:red;"> FullStacker </span><br><br>        <img src="/img/fullstacker.jpg" height="400px" width="400px"><br>    </div>]]></content>
    
    <summary type="html">


        &lt;link rel=&quot;stylesheet&quot; class=&quot;aplayer-secondary-style-marker&quot; href=&quot;/assets/css/APlayer.min.css&quot;&gt;&lt;script src=&quot;/assets/js/APlayer.min.js&quot; cla
      
    
    </summary>
    
      <category term="编程相关" scheme="https://itgoyo.github.io/categories/%E7%BC%96%E7%A8%8B%E7%9B%B8%E5%85%B3/"/>
    
    
      <category term="Program" scheme="https://itgoyo.github.io/tags/Program/"/>
    
  </entry>
  
  <entry>
    <title>记买一个4K显示器的过程</title>
    <link href="https://itgoyo.github.io/2019/08/28/%E8%AE%B0%E4%B9%B0%E4%B8%80%E4%B8%AA4K%E6%98%BE%E7%A4%BA%E5%99%A8%E7%9A%84%E8%BF%87%E7%A8%8B/"/>
    <id>https://itgoyo.github.io/2019/08/28/记买一个4K显示器的过程/</id>
    <published>2019-08-28T01:25:09.000Z</published>
    <updated>2020-01-02T05:51:32.241Z</updated>
    
    <content type="html"><![CDATA[<link rel="stylesheet" class="aplayer-secondary-style-marker" href="/assets/css/APlayer.min.css"><script src="/assets/js/APlayer.min.js" class="aplayer-secondary-script-marker"></script><p>&nbsp;&nbsp;由于最近在 B 站直播的次数有点多，还有就是平时录制的视频也有点人看了，所以想多做点视频发布到 B 站上面，但是自己看了以前的视频，发现视频确实画面确实粗糙，不仅仅是视频不清晰的原因，更主要的是我眼睛看着黑苹果的2k 屏幕看久了眼睛莫名的难受，毕竟苹果的渲染方式和 Windows 的不太一样，所以觉得上4K 是一件最近要完成的事情，然后可以把我2k 的显示器给我搞设计的弟弟用。<br>&nbsp;&nbsp;于是乎赶上了 jd 的活动，一款 LG 的4K ips 屏幕仅售1799，评价上万了，大概看了一下评价，感觉还行于是就下单了，显示器第二天就到了，开机一开，显示器底座确实辣鸡的一，是我用过那么多显示器最辣鸡的一个了，满满的塑料感，感觉会被压塌一样。底座嘛，无所谓，我可以换一个挂壁，确实也用了一个挂壁的支架，但是先后发货可能是出厂地方不同吧，没有同时到货。于是搭建好显示器，开机搞了很久才能点亮，好像要设置输出，不然屏幕接收不到信号。然后在 Windows 环境下使用鲁大师屏幕检测，没有坏点，但是右下角有黑色的泛光，看起来难受得很，于是决定退货。</p><p><img style="width:500px;height:500px" src="https://raw.githubusercontent.com/itgoyo/PicGoRes/master/img/20190828092907.png" alt="LG 27英寸 4K 超高清 IPS 硬屏" align="center"></p><p>&nbsp;&nbsp;退完货，所有款都到手了之后就在去 JD 上面逛了一下，决定加点钱，在弄一个底座好一点的显示器，是就搞了一个只是旋转还有上下转动的显示器也同样是 LG这个牌子的，为什么，只因为 LG 屏这个是有口碑的，国产的 AOC 价格虽然更便宜一些，但是也不是很想入，银色款确实不是我的菜。于是2199搞了第二台4K 显示器，然后第二天又送货到了，然后这个底座比之前的要好上了一些，不满意的是显示器的电源线，是我没见过的一种线，生怕坏了难找到同一个规格的线，但是看在颜色上还算不错的份上，算了，装吧。于是又搭建好了显示器，然后又一次的失望了，显示器右边漏光严重，如果单纯只是漏光的话，在某一个范围之内我还是可以接受的，但是这样子的漏光我着实不敢恭维啊，看着我眼睛都快瞎了，然后立马申请换货了。<br><img style="width:500px;height:500px" src="https://raw.githubusercontent.com/itgoyo/PicGoRes/master/img/20190828092915.png" alt="LG 27英寸 4K 超高清 HDR 10" align="center"></p><p>希望第三次过来的显示器能用吧，我已经不奢望完美屏幕了，起码给我一个能用的就行，谢天谢地了。</p><hr><div align="center"><br><br>        发现更多更好玩的，欢迎关注我的微信公众号:<span style="color:red;"> FullStacker </span><br><br>        <img src="/img/fullstacker.jpg" height="400px" width="400px"><br>    </div>]]></content>
    
    <summary type="html">


        &lt;link rel=&quot;stylesheet&quot; class=&quot;aplayer-secondary-style-marker&quot; href=&quot;/assets/css/APlayer.min.css&quot;&gt;&lt;script src=&quot;/assets/js/APlayer.min.js&quot; cla
      
    
    </summary>
    
      <category term="生活随笔" scheme="https://itgoyo.github.io/categories/%E7%94%9F%E6%B4%BB%E9%9A%8F%E7%AC%94/"/>
    
    
      <category term="生活随笔" scheme="https://itgoyo.github.io/tags/%E7%94%9F%E6%B4%BB%E9%9A%8F%E7%AC%94/"/>
    
  </entry>
  
  <entry>
    <title>关于自学编程的一些体会</title>
    <link href="https://itgoyo.github.io/2019/07/15/%E5%85%B3%E4%BA%8E%E8%87%AA%E5%AD%A6%E7%BC%96%E7%A8%8B%E7%9A%84%E4%B8%80%E4%BA%9B%E4%BD%93%E4%BC%9A/"/>
    <id>https://itgoyo.github.io/2019/07/15/关于自学编程的一些体会/</id>
    <published>2019-07-15T03:45:55.000Z</published>
    <updated>2020-01-02T05:51:32.455Z</updated>
    
    <content type="html"><![CDATA[<link rel="stylesheet" class="aplayer-secondary-style-marker" href="/assets/css/APlayer.min.css"><script src="/assets/js/APlayer.min.js" class="aplayer-secondary-script-marker"></script><p>先说说我是如何自学编程的吧，一般我学习一门新语言都时候是不看书的，首先书上的东西太多太杂了，完全分不清什么是重点什么是工作需要的什么是没必要学习的。所以我一直以来的自学编程都是从看视频开始的，但是看视频学习有一个缺点就是容易犯困，这个需要你有强硬的自制力了。我经常是站起来看视频经常困得人快倒下的时候给吓醒的，因为看视频我是加速看的，一直听感觉有些无聊，特别容易犯困，如果哪天你失眠了，你可以搞一个开发视频过来看看，有助于睡眠哟。</p><p>如果自己找不到你想要学习的视频，那就花钱买无论是 TB 还是闲鱼经常有这种贩卖资源的，价格便宜也就几块钱，几块钱你买不了吃亏你买不了上当。所以这些钱你是很有必要花的，不要觉得不值得只买了一个链接，你要知道你自己的时间也是有价值的，你现在是花钱去买时间，用省下来的时间去创造更多的价值，时间很宝贵。</p><p>建议弄一个学习小组，有共同点兴趣爱好，一起学习进步，你们时不时可以一起讨论问题，甚至可以协同合作尝试开发一个小项目。自己在自学的道路上是很孤独的，所以你很有必要有一个伴，不管是男伴还是女伴都不重要，以为到时候你重点都不是在伴上，而是撸码上的快感。严格要求自己，要培养一个好的开发习惯，勿以恶小而为之，勿以善小而不为。</p><p>编程最重要的是<code>多敲</code>,你看会了不代表你自己能够独立敲出来。我看过 Xdite 的编程课程，里面有一种编程方法挺好的，就是做什么都要做3遍以上。</p><ul><li><code>第一步</code>不管懂不懂先对着代码敲一遍。</li><li><code>第二步</code>理解了之后再去敲一遍。</li><li><code>第三步</code>不看代码，凭自己本事自己去敲出来。</li></ul><p>善于利用 <code>Google</code>，<code>Stackoverlow</code>来解决问题。永远不要好高骛远，先踏踏实实地把基础打牢，只有把基础打牢了，以后做什么都会得心应手。永远不要想着只有项目才能满足我，其实如果你基础不牢，看项目有时候也可能看不懂整个项目是啥意思，所以基础很重要。</p><p>祝你好运~</p><hr><div align="center"><br><br>        发现更多更好玩的，欢迎关注我的微信公众号:<span style="color:red;"> FullStacker </span><br><br>        <img src="/img/fullstacker.jpg" height="400px" width="400px"><br>    </div>]]></content>
    
    <summary type="html">


        &lt;link rel=&quot;stylesheet&quot; class=&quot;aplayer-secondary-style-marker&quot; href=&quot;/assets/css/APlayer.min.css&quot;&gt;&lt;script src=&quot;/assets/js/APlayer.min.js&quot; cla
      
    
    </summary>
    
      <category term="编程相关" scheme="https://itgoyo.github.io/categories/%E7%BC%96%E7%A8%8B%E7%9B%B8%E5%85%B3/"/>
    
    
      <category term="Program" scheme="https://itgoyo.github.io/tags/Program/"/>
    
  </entry>
  
  <entry>
    <title>养成学习做笔记的习惯</title>
    <link href="https://itgoyo.github.io/2019/07/15/%E5%85%BB%E6%88%90%E5%AD%A6%E4%B9%A0%E5%81%9A%E7%AC%94%E8%AE%B0%E7%9A%84%E4%B9%A0%E6%83%AF/"/>
    <id>https://itgoyo.github.io/2019/07/15/养成学习做笔记的习惯/</id>
    <published>2019-07-15T02:45:34.000Z</published>
    <updated>2020-01-02T05:51:32.456Z</updated>
    
    <content type="html"><![CDATA[<link rel="stylesheet" class="aplayer-secondary-style-marker" href="/assets/css/APlayer.min.css"><script src="/assets/js/APlayer.min.js" class="aplayer-secondary-script-marker"></script><p>学了那么多编程语言，但是感觉每次只要隔了一段时间没用过之后就基本忘了差不多了，每次网上搜索教程也都是菜鸟教程上面的东西。今天学习 <code>nodejs</code>的时候发现里面的源码居然有<code>BYVoid</code>这个关键字，怎么说也是我仰慕的一个人，或许菜鸟教程上面的代码都是书上面的代码，可能还是站长自己弄的没有组织。想想反正每次都要在菜鸟教程上面看教程为什么不直接在学习菜鸟教程的时候，同样吧上面的内容给同步到自己的个人博客上面去呢，这样子下次找资料或者重新学习的时候可能还可以回忆一些，所以只要把菜鸟上面的内容用目录的形式同步过来其实也就和本地服务器查看差不多了，或许还可能给自己的网站带来流量也说不定呢，哈哈哈~~~</p><hr><div align="center"><br><br>        发现更多更好玩的，欢迎关注我的微信公众号:<span style="color:red;"> FullStacker </span><br><br>        <img src="/img/fullstacker.jpg" height="400px" width="400px"><br>    </div>]]></content>
    
    <summary type="html">


        &lt;link rel=&quot;stylesheet&quot; class=&quot;aplayer-secondary-style-marker&quot; href=&quot;/assets/css/APlayer.min.css&quot;&gt;&lt;script src=&quot;/assets/js/APlayer.min.js&quot; cla
      
    
    </summary>
    
      <category term="编程相关" scheme="https://itgoyo.github.io/categories/%E7%BC%96%E7%A8%8B%E7%9B%B8%E5%85%B3/"/>
    
    
      <category term="Program" scheme="https://itgoyo.github.io/tags/Program/"/>
    
  </entry>
  
  <entry>
    <title>记hexo样式变化的奇怪错误</title>
    <link href="https://itgoyo.github.io/2019/07/15/%E8%AE%B0hexo%E6%A0%B7%E5%BC%8F%E5%8F%98%E5%8C%96%E7%9A%84%E5%A5%87%E6%80%AA%E9%94%99%E8%AF%AF/"/>
    <id>https://itgoyo.github.io/2019/07/15/记hexo样式变化的奇怪错误/</id>
    <published>2019-07-15T00:41:13.000Z</published>
    <updated>2020-01-02T05:51:32.418Z</updated>
    
    <content type="html"><![CDATA[<link rel="stylesheet" class="aplayer-secondary-style-marker" href="/assets/css/APlayer.min.css"><script src="/assets/js/APlayer.min.js" class="aplayer-secondary-script-marker"></script><p>最近每次更新 hexo 内容之后，每次提交到 Github 之后的展示效果和在本地的展示效果有些差异，然后想到问题的可能性就是少提交了某些东西。然后看到每次<code>hexo d</code>的时候都有需要权限的错误，估计和之前遇到的错误类似，就是我现在的这个用户没有<code>hexo</code>的绝对权限，所以修改<code>hexo</code>目录的权限即可，最简单的方式莫过于<code>sudo chown -R itgoyo /Users/itgoyo/Documents/hexo/</code>。所以为了保证日后每次提交都正常，每次执行 hexo 命令之前都要先输入上面那句修改目录权限的代码，希望对你们同样也有帮助。</p><hr><div align="center"><br><br>        发现更多更好玩的，欢迎关注我的微信公众号:<span style="color:red;"> FullStacker </span><br><br>        <img src="/img/fullstacker.jpg" height="400px" width="400px"><br>    </div>]]></content>
    
    <summary type="html">


        &lt;link rel=&quot;stylesheet&quot; class=&quot;aplayer-secondary-style-marker&quot; href=&quot;/assets/css/APlayer.min.css&quot;&gt;&lt;script src=&quot;/assets/js/APlayer.min.js&quot; cla
      
    
    </summary>
    
      <category term="编程相关" scheme="https://itgoyo.github.io/categories/%E7%BC%96%E7%A8%8B%E7%9B%B8%E5%85%B3/"/>
    
    
      <category term="Program" scheme="https://itgoyo.github.io/tags/Program/"/>
    
  </entry>
  
  <entry>
    <title>Hexo使用Valine评论系统并且使用邮件通知有新评论</title>
    <link href="https://itgoyo.github.io/2019/07/12/Hexo%E4%BD%BF%E7%94%A8Valine%E8%AF%84%E8%AE%BA%E7%B3%BB%E7%BB%9F%E5%B9%B6%E4%B8%94%E4%BD%BF%E7%94%A8%E9%82%AE%E4%BB%B6%E9%80%9A%E7%9F%A5%E6%9C%89%E6%96%B0%E8%AF%84%E8%AE%BA/"/>
    <id>https://itgoyo.github.io/2019/07/12/Hexo使用Valine评论系统并且使用邮件通知有新评论/</id>
    <published>2019-07-12T10:52:53.000Z</published>
    <updated>2020-01-02T05:54:59.627Z</updated>
    
    <content type="html"><![CDATA[<link rel="stylesheet" class="aplayer-secondary-style-marker" href="/assets/css/APlayer.min.css"><script src="/assets/js/APlayer.min.js" class="aplayer-secondary-script-marker"></script><p>今天在用 hexo 的时候发现个别文章有别人使用<code>Valine</code>的评论，但是当我发现的时候时间已经过去了几个月了，根本就不知道有消息提醒这回事，首先Value 没看到有一个管理员系统，所以没法查看总的未提醒数。后面在 Value 原作者 Github 上面发现了他有通过<code>leancloud</code>然后使用邮件来提醒，通过一个下午的实验终于成功了，我把捣弄过程中我遇到的坑给大家说一下。</p><h3 id="坑一"><a href="#坑一" class="headerlink" title="坑一"></a>坑一</h3><p>代码仓库地址是填写<a href="https://github.com/DesertsP/Valine-Admin.git" target="_blank" rel="noopener">https://github.com/DesertsP/Valine-Admin.git</a>不是填写你自己 Github 上面的仓库，统一都是使用这个地址，之前我不知道导致填写定时任务的时候一直出错。</p><h3 id="坑二"><a href="#坑二" class="headerlink" title="坑二"></a>坑二</h3><p>在填写接收邮箱密码的时候写的不是你的邮箱密码，而是在邮箱设置里面的POP3/IMAP生成的<code>授权码</code>，这个是随机生成的。之前一直调不通就是因为这个原因。</p><hr><h1 id="以下是原作者的教程打开可以参考一下"><a href="#以下是原作者的教程打开可以参考一下" class="headerlink" title="以下是原作者的教程打开可以参考一下"></a>以下是原作者的教程打开可以参考一下</h1><blockquote><p>aline Admin 是 <a href="https://panjunwen.com/diy-a-comment-system/" target="_blank" rel="noopener">Valine 评论系统</a>的扩展和增强，主要实现评论邮件通知、评论管理、垃圾评论过滤等功能。支持完全自定义的邮件通知模板，基于Akismet API实现准确的垃圾评论过滤。<br>近期更改了Github用户名请留意，仓库链接更新为<a href="https://github.com/DesertsP/Valine-Admin.git" target="_blank" rel="noopener">https://github.com/DesertsP/Valine-Admin.git</a></p></blockquote><h3 id="云引擎”一键”部署"><a href="#云引擎”一键”部署" class="headerlink" title="云引擎”一键”部署"></a>云引擎”一键”部署</h3><ol><li>在<a href="https://leancloud.cn/dashboard/#/apps" target="_blank" rel="noopener">Leancloud</a>云引擎设置界面，填写代码库并保存：<a href="https://github.com/DesertsP/Valine-Admin.git" target="_blank" rel="noopener">https://github.com/DesertsP/Valine-Admin.git</a></li></ol><p><img src="https://cloud.panjunwen.com/2018/09/ping-mu-kuai-zhao-2018-09-15-xia-wu-12-56-04.png" alt="设置仓库"></p><ol><li>在设置页面，设置环境变量以及 Web 二级域名。</li></ol><p><img src="https://cloud.panjunwen.com/2018/09/ping-mu-kuai-zhao-2018-09-15-xia-wu-3-40-48.png" alt="环境变量"></p><table><thead><tr><th>变量</th><th>示例</th><th>说明</th></tr></thead><tbody><tr><td>SITE_NAME</td><td>Deserts</td><td>[必填]博客名称</td></tr><tr><td>SITE_URL</td><td><a href="https://panjunwen.com/" target="_blank" rel="noopener">https://panjunwen.com</a></td><td>[必填]首页地址</td></tr><tr><td><strong>SMTP_SERVICE</strong></td><td>QQ</td><td>[新版支持]邮件服务提供商，支持 QQ、163、126、Gmail 以及 <a href="https://nodemailer.com/smtp/well-known/#supported-services" target="_blank" rel="noopener">更多</a></td></tr><tr><td>SMTP_USER</td><td><a href="mailto:xxxxxx@qq.com" target="_blank" rel="noopener">xxxxxx@qq.com</a></td><td>[必填]SMTP登录用户</td></tr><tr><td>SMTP_PASS</td><td>ccxxxxxxxxch</td><td>[必填]SMTP登录密码（QQ邮箱需要获取独立密码）</td></tr><tr><td>SENDER_NAME</td><td>Deserts</td><td>[必填]发件人</td></tr><tr><td>SENDER_EMAIL</td><td><a href="mailto:xxxxxx@qq.com" target="_blank" rel="noopener">xxxxxx@qq.com</a></td><td>[必填]发件邮箱</td></tr><tr><td>ADMIN_URL</td><td><a href="https://xxx.leanapp.cn/" target="_blank" rel="noopener">https://xxx.leanapp.cn/</a></td><td>[建议]Web主机二级域名，用于自动唤醒</td></tr><tr><td>BLOGGER_EMAIL</td><td><a href="mailto:xxxxx@gmail.com" target="_blank" rel="noopener">xxxxx@gmail.com</a></td><td>[可选]博主通知收件地址，默认使用SENDER_EMAIL</td></tr><tr><td>AKISMET_KEY</td><td>xxxxxxxxxxxx</td><td>[可选]Akismet Key 用于垃圾评论检测，设为MANUAL_REVIEW开启人工审核，留空不使用反垃圾</td></tr></tbody></table><p><strong>以上必填参数请务必正确设置。</strong></p><p>二级域名用于评论后台管理，如<a href="https://deserts.leanapp.cn/" target="_blank" rel="noopener">https://deserts.leanapp.cn</a> 。</p><p><img src="https://cloud.panjunwen.com/2018/09/ping-mu-kuai-zhao-2018-09-15-xia-wu-1-06-41.png" alt="二级域名"></p><ol><li>切换到部署标签页，分支使用master，点击部署即可</li></ol><p><img src="https://cloud.panjunwen.com/2018/09/ping-mu-kuai-zhao-2018-09-15-xia-wu-12-56-50.png" alt="一键部署"></p><p>第一次部署需要花点时间。</p><p><img src="https://cloud.panjunwen.com/2018/09/ping-mu-kuai-zhao-2018-09-15-xia-wu-1-00-45.png" alt="部署过程"></p><ol><li><p>评论管理。访问设置的二级域名<code>https://二级域名.leanapp.cn/sign-up</code>，注册管理员登录信息，如：<a href="https://deserts.leanapp.cn/sign-up" target="_blank" rel="noopener">https://deserts.leanapp.cn/sign-up</a><br><img src="https://cloud.panjunwen.com/2018/10/ping-mu-kuai-zhao-2018-10-22-xia-wu-9-35-51.png" alt="管理员注册"></p><blockquote><p>注：使用原版Valine如果遇到注册页面不显示直接跳转至登录页的情况，请手动删除_User表中的全部数据。</p></blockquote></li></ol><p>此后，可以通过<code>https://二级域名.leanapp.cn/</code>管理评论。</p><ol><li>定时任务设置</li></ol><p>目前实现了两种云函数定时任务：(1)自动唤醒，定时访问Web APP二级域名防止云引擎休眠；(2)每天定时检查24小时内漏发的邮件通知。</p><p>进入云引擎-定时任务中，创建定时器，创建两个定时任务。</p><p>选择self-wake云函数，Cron表达式为<code>0 0/30 7-23 * * ?</code>，表示每天早6点到晚23点每隔30分钟访问云引擎，<code>ADMIN_URL</code>环境变量务必设置正确：</p><p><img src="https://cloud.panjunwen.com/2018/09/ping-mu-kuai-zhao-2018-09-18-xia-wu-2-57-43.png" alt="唤醒云引擎"></p><p>选择resend-mails云函数，Cron表达式为<code>0 0 8 * * ?</code>，表示每天早8点检查过去24小时内漏发的通知邮件并补发：</p><p><img src="https://cloud.panjunwen.com/2018/09/ping-mu-kuai-zhao-2018-09-18-xia-wu-2-57-53.png" alt="通知检查"></p><p><strong>添加定时器后记得点击启动方可生效。</strong></p><p><strong>至此，Valine Admin 已经可以正常工作，更多以下是可选的进阶配置。</strong></p><h3 id="邮件通知模板"><a href="#邮件通知模板" class="headerlink" title="邮件通知模板"></a>邮件通知模板</h3><p>邮件通知模板在云引擎环境变量中设定，可自定义通知邮件标题及内容模板。</p><table><thead><tr><th>环境变量</th><th>示例</th><th>说明</th></tr></thead><tbody><tr><td>MAIL_SUBJECT</td><td>${PARENT_NICK}，您在${SITE_NAME}上的评论收到了回复</td><td>[可选]@通知邮件主题（标题）模板</td></tr><tr><td>MAIL_TEMPLATE</td><td>见下文</td><td>[可选]@通知邮件内容模板</td></tr><tr><td>MAIL_SUBJECT_ADMIN</td><td>${SITE_NAME}上有新评论了</td><td>[可选]博主邮件通知主题模板</td></tr><tr><td>MAIL_TEMPLATE_ADMIN</td><td>见下文</td><td>[可选]博主邮件通知内容模板</td></tr></tbody></table><p>邮件通知包含两种，分别是被@通知和博主通知，这两种模板都可以完全自定义。默认使用经典的蓝色风格模板（样式来源未知）。</p><p>默认被@通知邮件内容模板如下：</p><figure class="highlight html"><table><tr><td class="gutter"><pre><span class="line">1</span><br></pre></td><td class="code"><pre><span class="line"><span class="tag">&lt;<span class="name">div</span> <span class="attr">style</span>=<span class="string">"border-top:2px solid #12ADDB;box-shadow:0 1px 3px #AAAAAA;line-height:180%;padding:0 15px 12px;margin:50px auto;font-size:12px;"</span>&gt;</span><span class="tag">&lt;<span class="name">h2</span> <span class="attr">style</span>=<span class="string">"border-bottom:1px solid #DDD;font-size:14px;font-weight:normal;padding:13px 0 10px 8px;"</span>&gt;</span>您在<span class="tag">&lt;<span class="name">a</span> <span class="attr">style</span>=<span class="string">"text-decoration:none;color: #12ADDB;"</span> <span class="attr">href</span>=<span class="string">"$&#123;SITE_URL&#125;"</span> <span class="attr">target</span>=<span class="string">"_blank"</span>&gt;</span>            $&#123;SITE_NAME&#125;<span class="tag">&lt;/<span class="name">a</span>&gt;</span>上的评论有了新的回复<span class="tag">&lt;/<span class="name">h2</span>&gt;</span> $&#123;PARENT_NICK&#125; 同学，您曾发表评论：<span class="tag">&lt;<span class="name">div</span> <span class="attr">style</span>=<span class="string">"padding:0 12px 0 12px;margin-top:18px"</span>&gt;</span><span class="tag">&lt;<span class="name">div</span> <span class="attr">style</span>=<span class="string">"background-color: #f5f5f5;padding: 10px 15px;margin:18px 0;word-wrap:break-word;"</span>&gt;</span>            $&#123;PARENT_COMMENT&#125;<span class="tag">&lt;/<span class="name">div</span>&gt;</span><span class="tag">&lt;<span class="name">p</span>&gt;</span><span class="tag">&lt;<span class="name">strong</span>&gt;</span>$&#123;NICK&#125;<span class="tag">&lt;/<span class="name">strong</span>&gt;</span>回复说：<span class="tag">&lt;/<span class="name">p</span>&gt;</span><span class="tag">&lt;<span class="name">div</span> <span class="attr">style</span>=<span class="string">"background-color: #f5f5f5;padding: 10px 15px;margin:18px 0;word-wrap:break-word;"</span>&gt;</span> $&#123;COMMENT&#125;<span class="tag">&lt;/<span class="name">div</span>&gt;</span><span class="tag">&lt;<span class="name">p</span>&gt;</span>您可以点击<span class="tag">&lt;<span class="name">a</span> <span class="attr">style</span>=<span class="string">"text-decoration:none; color:#12addb"</span> <span class="attr">href</span>=<span class="string">"$&#123;POST_URL&#125;"</span> <span class="attr">target</span>=<span class="string">"_blank"</span>&gt;</span>查看回复的完整內容<span class="tag">&lt;/<span class="name">a</span>&gt;</span>，欢迎再次光临<span class="tag">&lt;<span class="name">a</span> <span class="attr">style</span>=<span class="string">"text-decoration:none; color:#12addb"</span> <span class="attr">href</span>=<span class="string">"$&#123;SITE_URL&#125;"</span> <span class="attr">target</span>=<span class="string">"_blank"</span>&gt;</span>$&#123;SITE_NAME&#125;<span class="tag">&lt;/<span class="name">a</span>&gt;</span>。<span class="tag">&lt;<span class="name">br</span>&gt;</span><span class="tag">&lt;/<span class="name">p</span>&gt;</span><span class="tag">&lt;/<span class="name">div</span>&gt;</span><span class="tag">&lt;/<span class="name">div</span>&gt;</span></span><br></pre></td></tr></table></figure><p>效果如下图：</p><p><img src="https://cloud.panjunwen.com/2018/09/wei-ming-ming.png" alt="mail-blue-template"></p><p>@通知模板中的可用变量如下（注，这是邮件模板变量，是指嵌入到HTML邮件模板中的变量，请勿与云引擎环境变量混淆）：</p><table><thead><tr><th>模板变量</th><th>说明</th></tr></thead><tbody><tr><td>SITE_NAME</td><td>博客名称</td></tr><tr><td>SITE_URL</td><td>博客首页地址</td></tr><tr><td>POST_URL</td><td>文章地址（完整路径）</td></tr><tr><td>PARENT_NICK</td><td>收件人昵称（被@者，父级评论人）</td></tr><tr><td>PARENT_COMMENT</td><td>父级评论内容</td></tr><tr><td>NICK</td><td>新评论者昵称</td></tr><tr><td>COMMENT</td><td>新评论内容</td></tr></tbody></table><p>默认博主通知邮件内容模板如下：</p><figure class="highlight html"><table><tr><td class="gutter"><pre><span class="line">1</span><br></pre></td><td class="code"><pre><span class="line"><span class="tag">&lt;<span class="name">div</span> <span class="attr">style</span>=<span class="string">"border-top:2px solid #12ADDB;box-shadow:0 1px 3px #AAAAAA;line-height:180%;padding:0 15px 12px;margin:50px auto;font-size:12px;"</span>&gt;</span><span class="tag">&lt;<span class="name">h2</span> <span class="attr">style</span>=<span class="string">"border-bottom:1px solid #DDD;font-size:14px;font-weight:normal;padding:13px 0 10px 8px;"</span>&gt;</span>您在<span class="tag">&lt;<span class="name">a</span> <span class="attr">style</span>=<span class="string">"text-decoration:none;color: #12ADDB;"</span> <span class="attr">href</span>=<span class="string">"$&#123;SITE_URL&#125;"</span> <span class="attr">target</span>=<span class="string">"_blank"</span>&gt;</span>$&#123;SITE_NAME&#125;<span class="tag">&lt;/<span class="name">a</span>&gt;</span>上的文章有了新的评论<span class="tag">&lt;/<span class="name">h2</span>&gt;</span><span class="tag">&lt;<span class="name">p</span>&gt;</span><span class="tag">&lt;<span class="name">strong</span>&gt;</span>$&#123;NICK&#125;<span class="tag">&lt;/<span class="name">strong</span>&gt;</span>回复说：<span class="tag">&lt;/<span class="name">p</span>&gt;</span><span class="tag">&lt;<span class="name">div</span> <span class="attr">style</span>=<span class="string">"background-color: #f5f5f5;padding: 10px 15px;margin:18px 0;word-wrap:break-word;"</span>&gt;</span> $&#123;COMMENT&#125;<span class="tag">&lt;/<span class="name">div</span>&gt;</span><span class="tag">&lt;<span class="name">p</span>&gt;</span>您可以点击<span class="tag">&lt;<span class="name">a</span> <span class="attr">style</span>=<span class="string">"text-decoration:none; color:#12addb"</span> <span class="attr">href</span>=<span class="string">"$&#123;POST_URL&#125;"</span> <span class="attr">target</span>=<span class="string">"_blank"</span>&gt;</span>查看回复的完整內容<span class="tag">&lt;/<span class="name">a</span>&gt;</span><span class="tag">&lt;<span class="name">br</span>&gt;</span><span class="tag">&lt;/<span class="name">p</span>&gt;</span><span class="tag">&lt;/<span class="name">div</span>&gt;</span><span class="tag">&lt;/<span class="name">div</span>&gt;</span></span><br></pre></td></tr></table></figure><p>博主通知邮件模板中的可用变量与@通知中的基本一致，<strong><code>PARENT_NICK</code> 和 <code>PARENT_COMMENT</code> 变量不再可用。</strong></p><p>这里还提供一个彩虹风格的@通知邮件模板代码：</p><figure class="highlight html"><table><tr><td class="gutter"><pre><span class="line">1</span><br></pre></td><td class="code"><pre><span class="line"><span class="tag">&lt;<span class="name">div</span> <span class="attr">style</span>=<span class="string">"border-radius: 10px 10px 10px 10px;font-size:13px;    color: #555555;width: 666px;font-family:'Century Gothic','Trebuchet MS','Hiragino Sans GB',微软雅黑,'Microsoft Yahei',Tahoma,Helvetica,Arial,'SimSun',sans-serif;margin:50px auto;border:1px solid #eee;max-width:100%;background: #ffffff repeating-linear-gradient(-45deg,#fff,#fff 1.125rem,transparent 1.125rem,transparent 2.25rem);box-shadow: 0 1px 5px rgba(0, 0, 0, 0.15);"</span>&gt;</span><span class="tag">&lt;<span class="name">div</span> <span class="attr">style</span>=<span class="string">"width:100%;background:#49BDAD;color:#ffffff;border-radius: 10px 10px 0 0;background-image: -moz-linear-gradient(0deg, rgb(67, 198, 184), rgb(255, 209, 244));background-image: -webkit-linear-gradient(0deg, rgb(67, 198, 184), rgb(255, 209, 244));height: 66px;"</span>&gt;</span><span class="tag">&lt;<span class="name">p</span> <span class="attr">style</span>=<span class="string">"font-size:15px;word-break:break-all;padding: 23px 32px;margin:0;background-color: hsla(0,0%,100%,.4);border-radius: 10px 10px 0 0;"</span>&gt;</span>您在<span class="tag">&lt;<span class="name">a</span> <span class="attr">style</span>=<span class="string">"text-decoration:none;color: #ffffff;"</span> <span class="attr">href</span>=<span class="string">"$&#123;SITE_URL&#125;"</span>&gt;</span> $&#123;SITE_NAME&#125;<span class="tag">&lt;/<span class="name">a</span>&gt;</span>上的留言有新回复啦！<span class="tag">&lt;/<span class="name">p</span>&gt;</span><span class="tag">&lt;/<span class="name">div</span>&gt;</span><span class="tag">&lt;<span class="name">div</span> <span class="attr">style</span>=<span class="string">"margin:40px auto;width:90%"</span>&gt;</span><span class="tag">&lt;<span class="name">p</span>&gt;</span>$&#123;PARENT_NICK&#125; 同学，您曾在文章上发表评论：<span class="tag">&lt;/<span class="name">p</span>&gt;</span><span class="tag">&lt;<span class="name">div</span> <span class="attr">style</span>=<span class="string">"background: #fafafa repeating-linear-gradient(-45deg,#fff,#fff 1.125rem,transparent 1.125rem,transparent 2.25rem);box-shadow: 0 2px 5px rgba(0, 0, 0, 0.15);margin:20px 0px;padding:15px;border-radius:5px;font-size:14px;color:#555555;"</span>&gt;</span>$&#123;PARENT_COMMENT&#125;<span class="tag">&lt;/<span class="name">div</span>&gt;</span><span class="tag">&lt;<span class="name">p</span>&gt;</span>$&#123;NICK&#125; 给您的回复如下：<span class="tag">&lt;/<span class="name">p</span>&gt;</span><span class="tag">&lt;<span class="name">div</span> <span class="attr">style</span>=<span class="string">"background: #fafafa repeating-linear-gradient(-45deg,#fff,#fff 1.125rem,transparent 1.125rem,transparent 2.25rem);box-shadow: 0 2px 5px rgba(0, 0, 0, 0.15);margin:20px 0px;padding:15px;border-radius:5px;font-size:14px;color:#555555;"</span>&gt;</span>$&#123;COMMENT&#125;<span class="tag">&lt;/<span class="name">div</span>&gt;</span><span class="tag">&lt;<span class="name">p</span>&gt;</span>您可以点击<span class="tag">&lt;<span class="name">a</span> <span class="attr">style</span>=<span class="string">"text-decoration:none; color:#12addb"</span> <span class="attr">href</span>=<span class="string">"$&#123;POST_URL&#125;#comments"</span>&gt;</span>查看回复的完整內容<span class="tag">&lt;/<span class="name">a</span>&gt;</span>，欢迎再次光临<span class="tag">&lt;<span class="name">a</span> <span class="attr">style</span>=<span class="string">"text-decoration:none; color:#12addb"</span>                <span class="attr">href</span>=<span class="string">"$&#123;SITE_URL&#125;"</span>&gt;</span> $&#123;SITE_NAME&#125;<span class="tag">&lt;/<span class="name">a</span>&gt;</span>。<span class="tag">&lt;/<span class="name">p</span>&gt;</span><span class="tag">&lt;<span class="name">style</span> <span class="attr">type</span>=<span class="string">"text/css"</span>&gt;</span><span class="undefined">a:link&#123;text-decoration:none&#125;a:visited&#123;text-decoration:none&#125;a:hover&#123;text-decoration:none&#125;a:active&#123;text-decoration:none&#125;</span><span class="tag">&lt;/<span class="name">style</span>&gt;</span><span class="tag">&lt;/<span class="name">div</span>&gt;</span><span class="tag">&lt;/<span class="name">div</span>&gt;</span></span><br></pre></td></tr></table></figure><p>效果如图：</p><p><img src="https://cloud.panjunwen.com/2018/09/ping-mu-kuai-zhao-2018-09-15-xia-wu-5-17-21.png" alt="彩虹模板"></p><h3 id="垃圾评论检测"><a href="#垃圾评论检测" class="headerlink" title="垃圾评论检测"></a>垃圾评论检测</h3><blockquote><p>Akismet (Automattic Kismet)是应用广泛的一个垃圾留言过滤系统，其作者是大名鼎鼎的WordPress 创始人 Matt Mullenweg，Akismet也是WordPress默认安装的插件，其使用非常广泛，设计目标便是帮助博客网站来过滤留言Spam。有了Akismet之后，基本上不用担心垃圾留言的烦恼了。<br>启用Akismet后，当博客再收到留言会自动将其提交到Akismet并与Akismet上的黑名单进行比对，如果名列该黑名单中，则该条留言会被标记为垃圾评论且不会发布。</p></blockquote><p>如果还没有Akismet Key，你可以去 <a href="https://akismet.com/development/" target="_blank" rel="noopener">AKISMET FOR DEVELOPERS 免费申请一个</a>；<br><strong>当AKISMET_KEY设为MANUAL_REVIEW时，开启人工审核模式；</strong><br>如果你不需要反垃圾评论，Akismet Key 环境变量可以忽略。</p><p><strong>为了实现较为精准的垃圾评论识别，采集的判据除了评论内容、邮件地址和网站地址外，还包括评论者的IP地址、浏览器信息等，但仅在云引擎后台使用这些数据，确保隐私和安全。</strong></p><p><strong>如果使用了本站最新的Valine和Valine Admin，并设置了Akismet Key，可以有效地拦截垃圾评论。被标为垃圾的评论可以在管理页面取消标注。</strong></p><table><thead><tr><th>环境变量</th><th>示例</th><th>说明</th></tr></thead><tbody><tr><td>AKISMET_KEY</td><td>xxxxxxxxxxxx</td><td>[可选]Akismet Key 用于垃圾评论检测</td></tr></tbody></table><h3 id="防止云引擎休眠"><a href="#防止云引擎休眠" class="headerlink" title="防止云引擎休眠"></a>防止云引擎休眠</h3><p>关于自动休眠的官方说法：<a href="https://leancloud.cn/docs/leanengine_plan.html#hash633315134" target="_blank" rel="noopener">点击查看</a></p><p>目前最新版的 Valine Admin 已经可以实现自唤醒，即在 LeanCloud 云引擎中定时请求 Web 应用地址防止休眠。对于夜间休眠期漏发的邮件通知，自动在次日早上补发。<strong>务必确保配置中设置了ADMIN_URL环境变量，并在第5步添加了两个云函数定时任务。</strong></p><h3 id="Troubleshooting"><a href="#Troubleshooting" class="headerlink" title="Troubleshooting"></a>Troubleshooting</h3><ul><li><p>部署失败，请在评论中附图，或去Github发起Issue</p></li><li><p>邮件发送失败，确保环境变量都没问题后，重启云引擎</p><p><img src="https://cloud.panjunwen.com/2018/09/ping-mu-kuai-zhao-2018-09-15-xia-wu-5-22-56.png" alt="重启云引擎"></p></li><li><p>博主通知模板中不要出现<code>PARENT*</code>相关参数（请勿混用模板）</p></li><li><p>点击邮件中的链接跳转至相应评论，这一细节实现需要一点额外的代码：</p></li></ul><figure class="highlight javascript"><table><tr><td class="gutter"><pre><span class="line">1</span><br><span class="line">2</span><br><span class="line">3</span><br><span class="line">4</span><br><span class="line">5</span><br><span class="line">6</span><br><span class="line">7</span><br><span class="line">8</span><br><span class="line">9</span><br><span class="line">10</span><br></pre></td><td class="code"><pre><span class="line">&lt;script&gt;</span><br><span class="line">    <span class="keyword">if</span>(<span class="built_in">window</span>.location.hash)&#123;</span><br><span class="line">        <span class="keyword">var</span> checkExist = setInterval(<span class="function"><span class="keyword">function</span>(<span class="params"></span>) </span>&#123;</span><br><span class="line">           <span class="keyword">if</span> ($(<span class="built_in">window</span>.location.hash).length) &#123;</span><br><span class="line">              $(<span class="string">'html, body'</span>).animate(&#123;<span class="attr">scrollTop</span>: $(<span class="built_in">window</span>.location.hash).offset().top<span class="number">-90</span>&#125;, <span class="number">1000</span>);</span><br><span class="line">              clearInterval(checkExist);</span><br><span class="line">           &#125;</span><br><span class="line">        &#125;, <span class="number">100</span>);</span><br><span class="line">    &#125;</span><br><span class="line">&lt;<span class="regexp">/script&gt;</span></span><br></pre></td></tr></table></figure><ul><li>自定义邮件服务器地址和端口信息，删除SMTP_SERVICE环境变量，新增以下变量：</li></ul><table><thead><tr><th>变量</th><th>示例</th><th>说明</th></tr></thead><tbody><tr><td>SMTP_HOST</td><td>smtp.qq.com</td><td>[可选]SMTP_SERVICE留空时，自定义SMTP服务器地址</td></tr><tr><td>SMTP_PORT</td><td>465</td><td>[可选]SMTP_SERVICE留空时，自定义SMTP端口</td></tr><tr><td>SMTP_SECURE</td><td>true</td><td>[可选]SMTP_SERVICE留空时填写</td></tr></tbody></table><ul><li>这是我的环境变量配置，绿色框中是邮箱服务相关配置，红色为邮件通知模板。</li></ul><p><img src="https://cloud.panjunwen.com/2018/11/ping-mu-kuai-zhao-2018-11-13-xia-wu-9-30-28.png" alt="ping-mu-kuai-zhao-2018-11-13-xia-wu-9-30-28"></p><hr><div align="center"><br><br>        发现更多更好玩的，欢迎关注我的微信公众号:<span style="color:red;"> FullStacker </span><br><br>        <img src="/img/fullstacker.jpg" height="400px" width="400px"><br>    </div>]]></content>
    
    <summary type="html">


        &lt;link rel=&quot;stylesheet&quot; class=&quot;aplayer-secondary-style-marker&quot; href=&quot;/assets/css/APlayer.min.css&quot;&gt;&lt;script src=&quot;/assets/js/APlayer.min.js&quot; cla
      
    
    </summary>
    
      <category term="编程相关" scheme="https://itgoyo.github.io/categories/%E7%BC%96%E7%A8%8B%E7%9B%B8%E5%85%B3/"/>
    
    
      <category term="Program" scheme="https://itgoyo.github.io/tags/Program/"/>
    
  </entry>
  
</feed>
